Browse by Topic
Select a category to explore guides and step-by-step articles.
DLT Registration Overview — What Every Business Must Know
DLT (Distributed Ledger Technology) registration is mandatory for all businesses sending commercial SMS in India, as per TRAI regulations. Without DLT compliance, your messages will be blocked by telecom operators. This guide walks you through everything you need to register and go live.
What is DLT?
DLT stands for Distributed Ledger Technology. The Telecom Regulatory Authority of India (TRAI) introduced the DLT system to curb spam and protect consumers from unsolicited commercial communications (UCC). The technology is designed to reduce spam, increase telecom subscriber safety, and improve trust.
A Business Entity must register itself on the DLT portal, register Sender IDs (Headers), submit message templates, and get their approval before sending Bulk SMS.
Four Key DLT Components
| # | Component | Description |
|---|---|---|
| 1 | 🏢 Entity Registration | Register your business as a Principal Entity on the DLT portal |
| 2 | 📤 Header (Sender ID) | Register the 6-character Sender ID (e.g. NESARK) shown in your messages |
| 3 | 📝 Template Registration | Submit and get approval for all SMS message templates before sending |
| 4 | 🔗 PE-TM Binding & CTA Whitelisting | Whitelist any URLs used in SMS and bind your Telemarketer account |
Complete DLT Registration Process — 4 Steps
Pick SmartPing (recommended), Jio, Airtel, BSNL, or any TRAI-authorized platform. Registering on one platform is sufficient — DLT data syncs automatically across all telecom operators.
Create your account on the DLT portal, upload your business documents (PAN, Aadhaar, MSME/GST Certificate, LOA), and complete KYC verification online.
Add your 6-character Sender ID (Header) and submit all SMS message templates for approval. Each template must be pre-approved before use.
Receive approvals in 24–48 hours. Link to your Nesark account and start sending. With Nesark's support, DLT registration can be completed in as fast as 2–3 hours (subject to correct documents).
Understanding SMS Route Types
| Route | Use Case | Timing | Numbers |
|---|---|---|---|
| 📢 Promotional | Marketing campaigns, offers | 10 AM – 9 PM only | Non-DND only |
| 🔒 Transactional | Bank OTP SMS only | 24×7 | DND & Non-DND |
| 🔔 Service Implicit/Inferred | Login OTPs, order updates, alerts | 24×7 | DND & Non-DND |
DLT Registration Portals
Register on any one portal — data syncs automatically across all operators. Nesark recommends SmartPing for fastest approval and 2-year validity.
| Portal | Validity | Link |
|---|---|---|
| ⭐ SmartPing (Recommended) | 2 Years | Register → |
| 📡 Jio TrueConnect | 1 Year | Register → |
| 📶 Airtel DLT Connect | 1 Year | Register → |
| 📱 VILPOWER (Vi) | 1 Year | Register → |
| 🏢 Tata Tele | 1 Year | Register → |
| 🌐 BSNL UCC | 1 Year | Register → |
| 📞 Connect | 1 Year | Register → |
Need help with DLT Registration?
Nesark's experts handle the complete process — document verification, submission & follow-up — free consultation, no obligation.
Entity Registration on DLT — Step-by-Step Guide
Entity Registration is the first and most important step in DLT compliance. You must register your business as a Principal Entity (PE) on a TRAI-approved DLT portal before you can register headers or templates. Nesark recommends SmartPing for fastest approval.
Step 1 — Visit SmartPing Portal
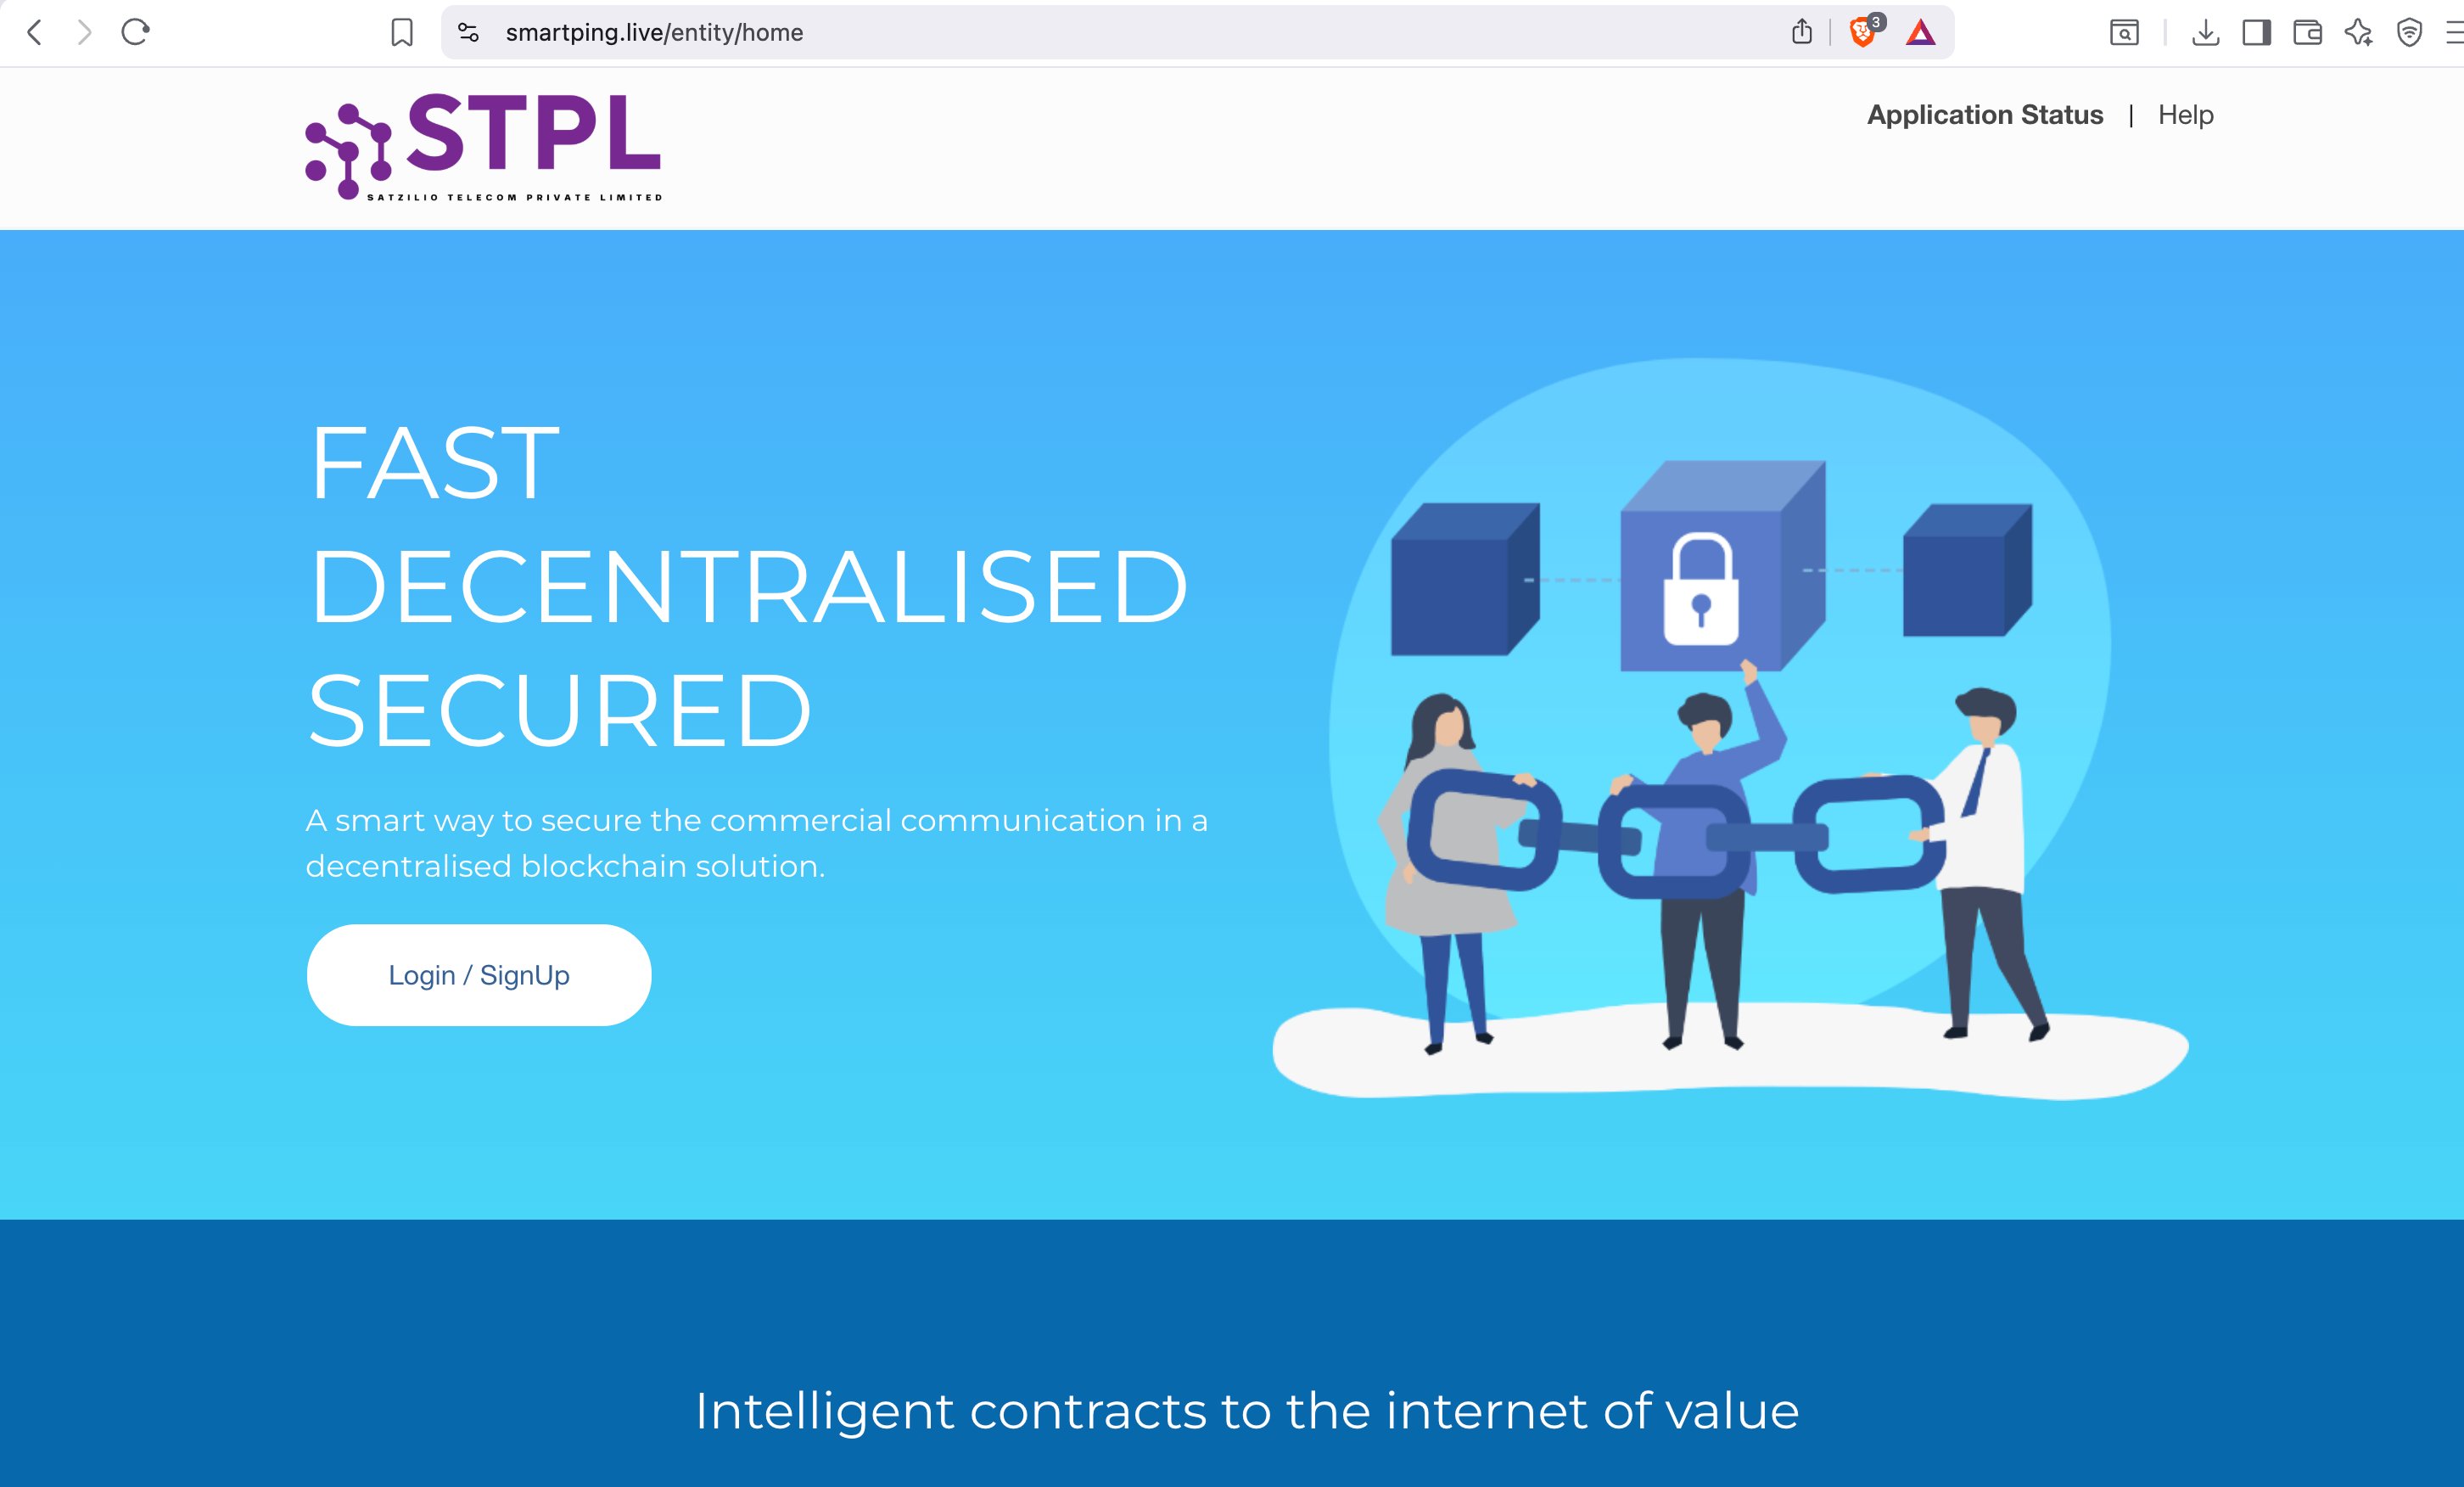
Visit smartping.live/entity/home — the official SmartPing (STPL) DLT portal. Click the "Login / SignUp" button to get started.
Step 2 — Select Registration Type
You will see a screen asking you to select the type of operation. Select "As Entity" and click Next.
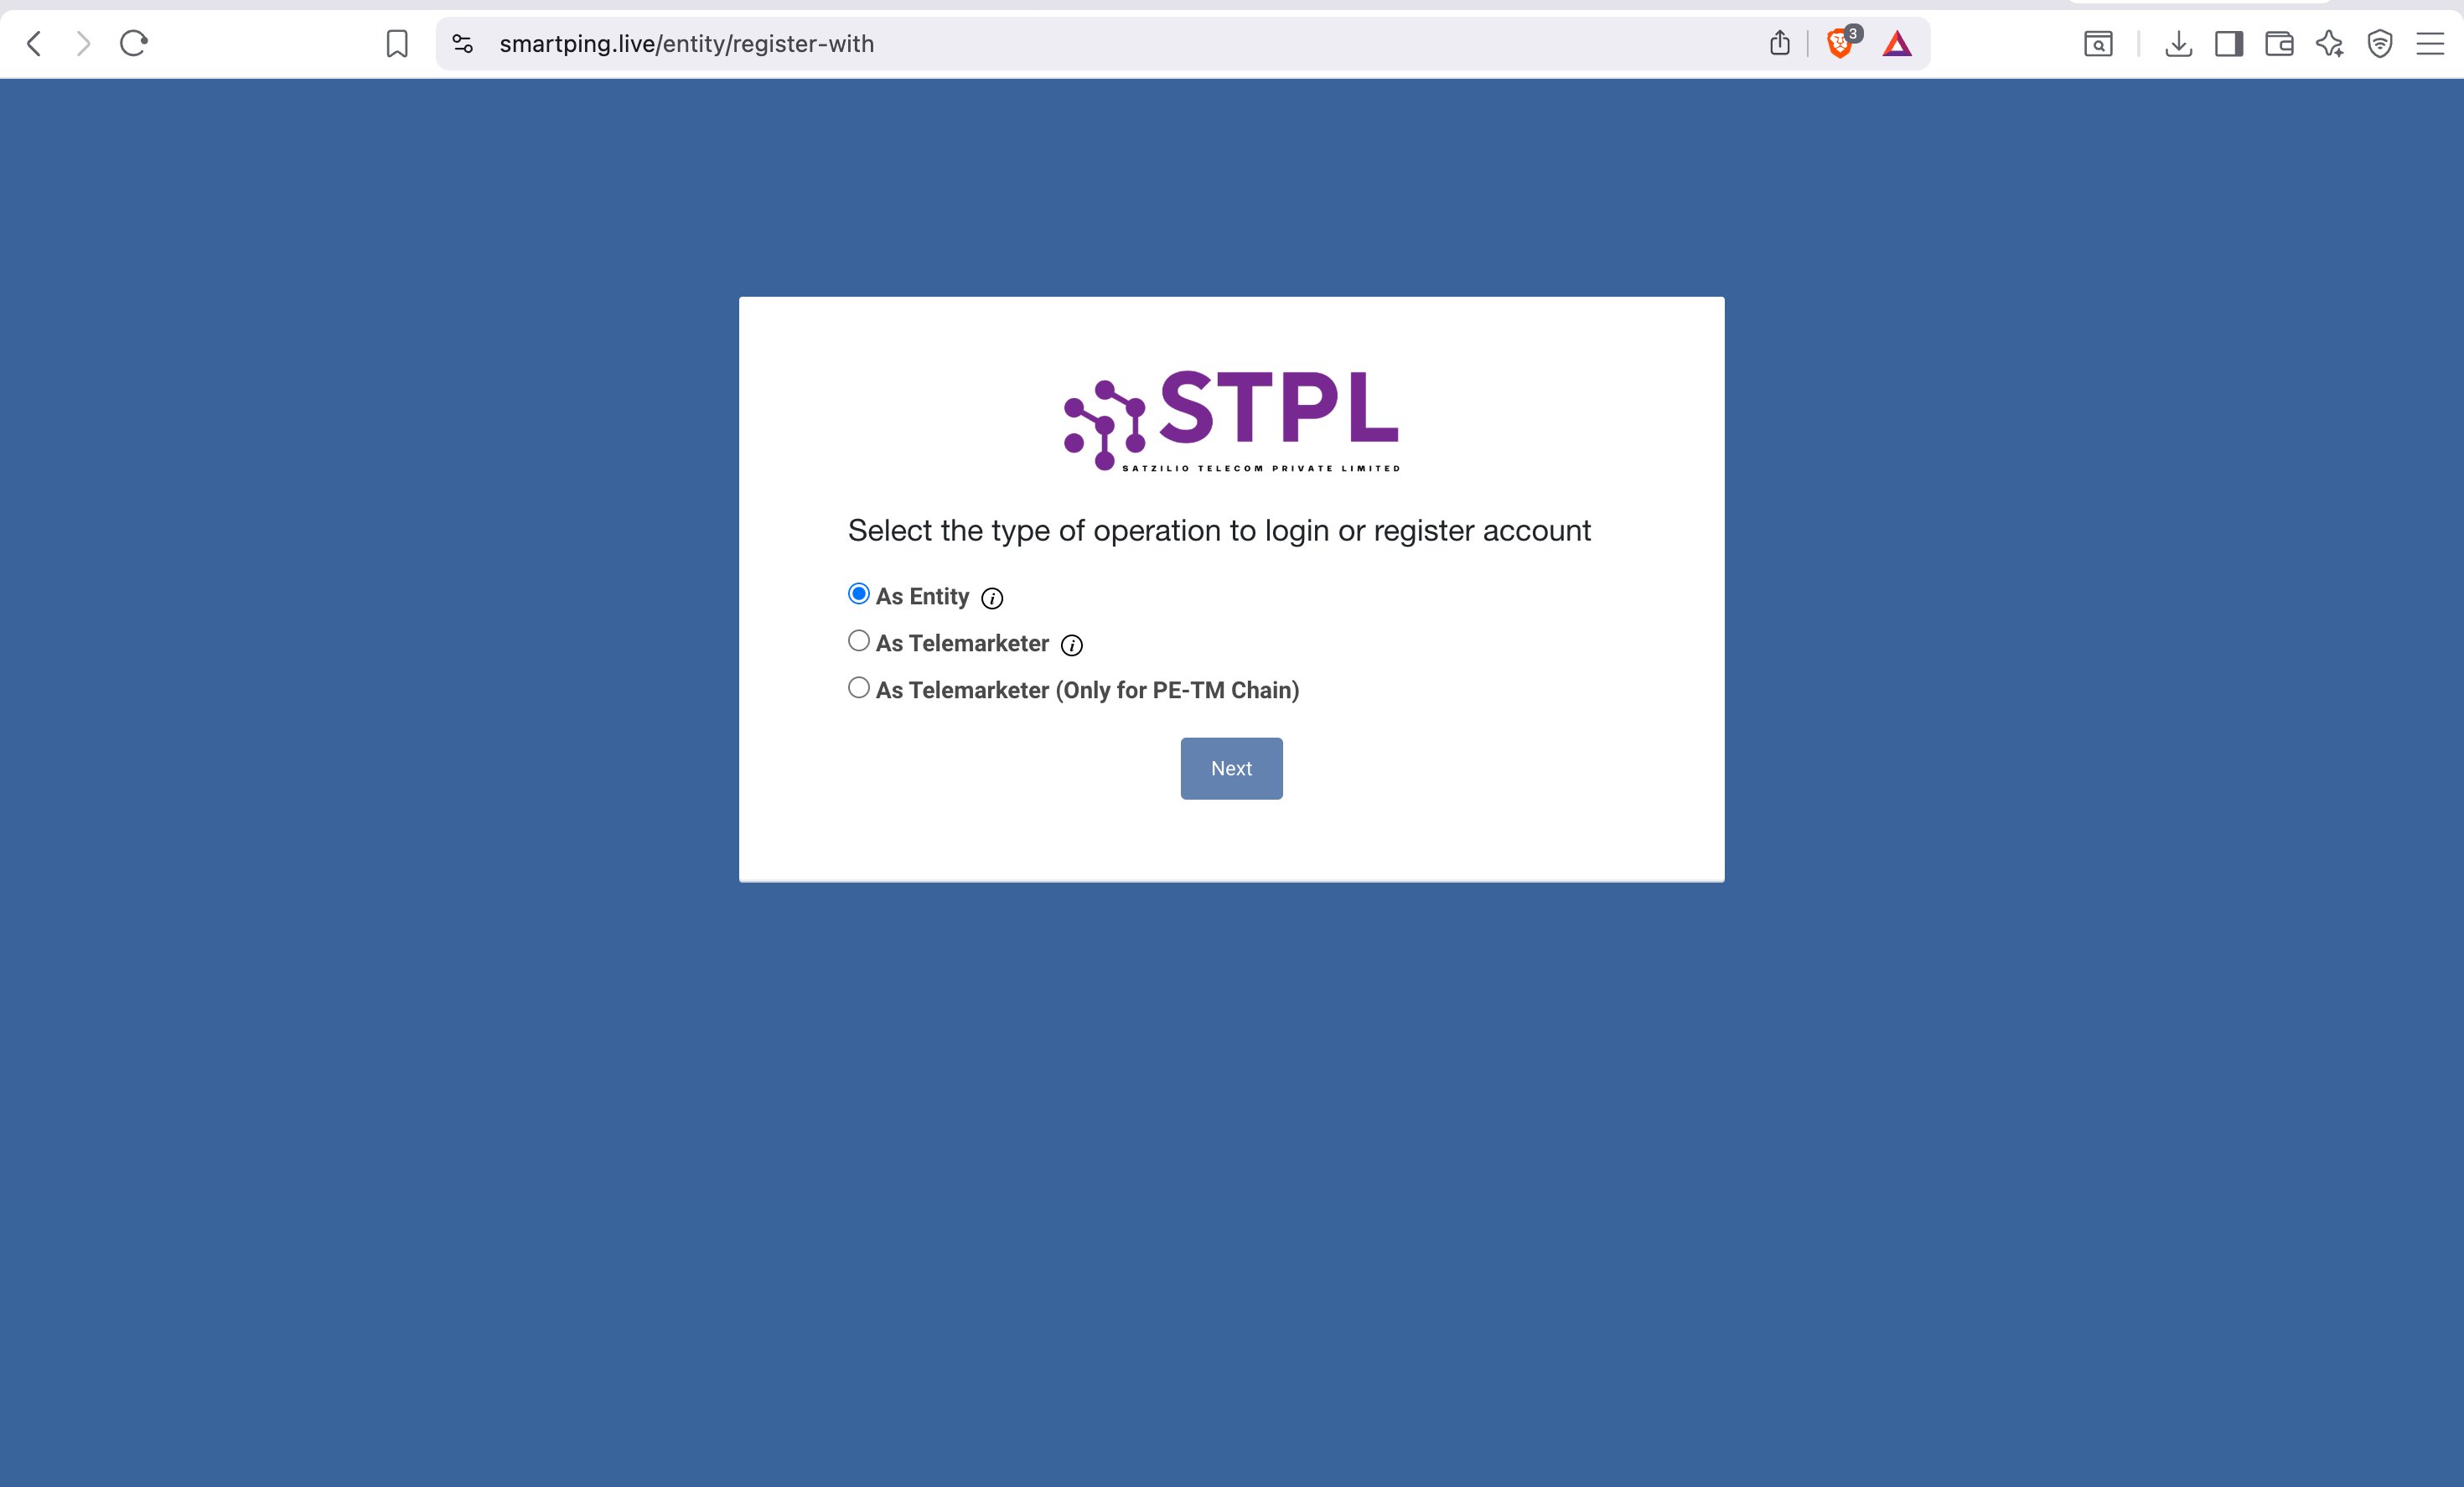
| Option | Who Should Select |
|---|---|
| As Entity ✅ | Businesses registering to send commercial SMS — select this |
| As Telemarketer | SMS service providers / resellers — not for businesses |
| As Telemarketer (Only for PE-TM Chain) | Advanced use case — not required for standard registration |
Step 3 — New Registration or Enrol Entity
You will see the Customer Acquisition Form with two options:
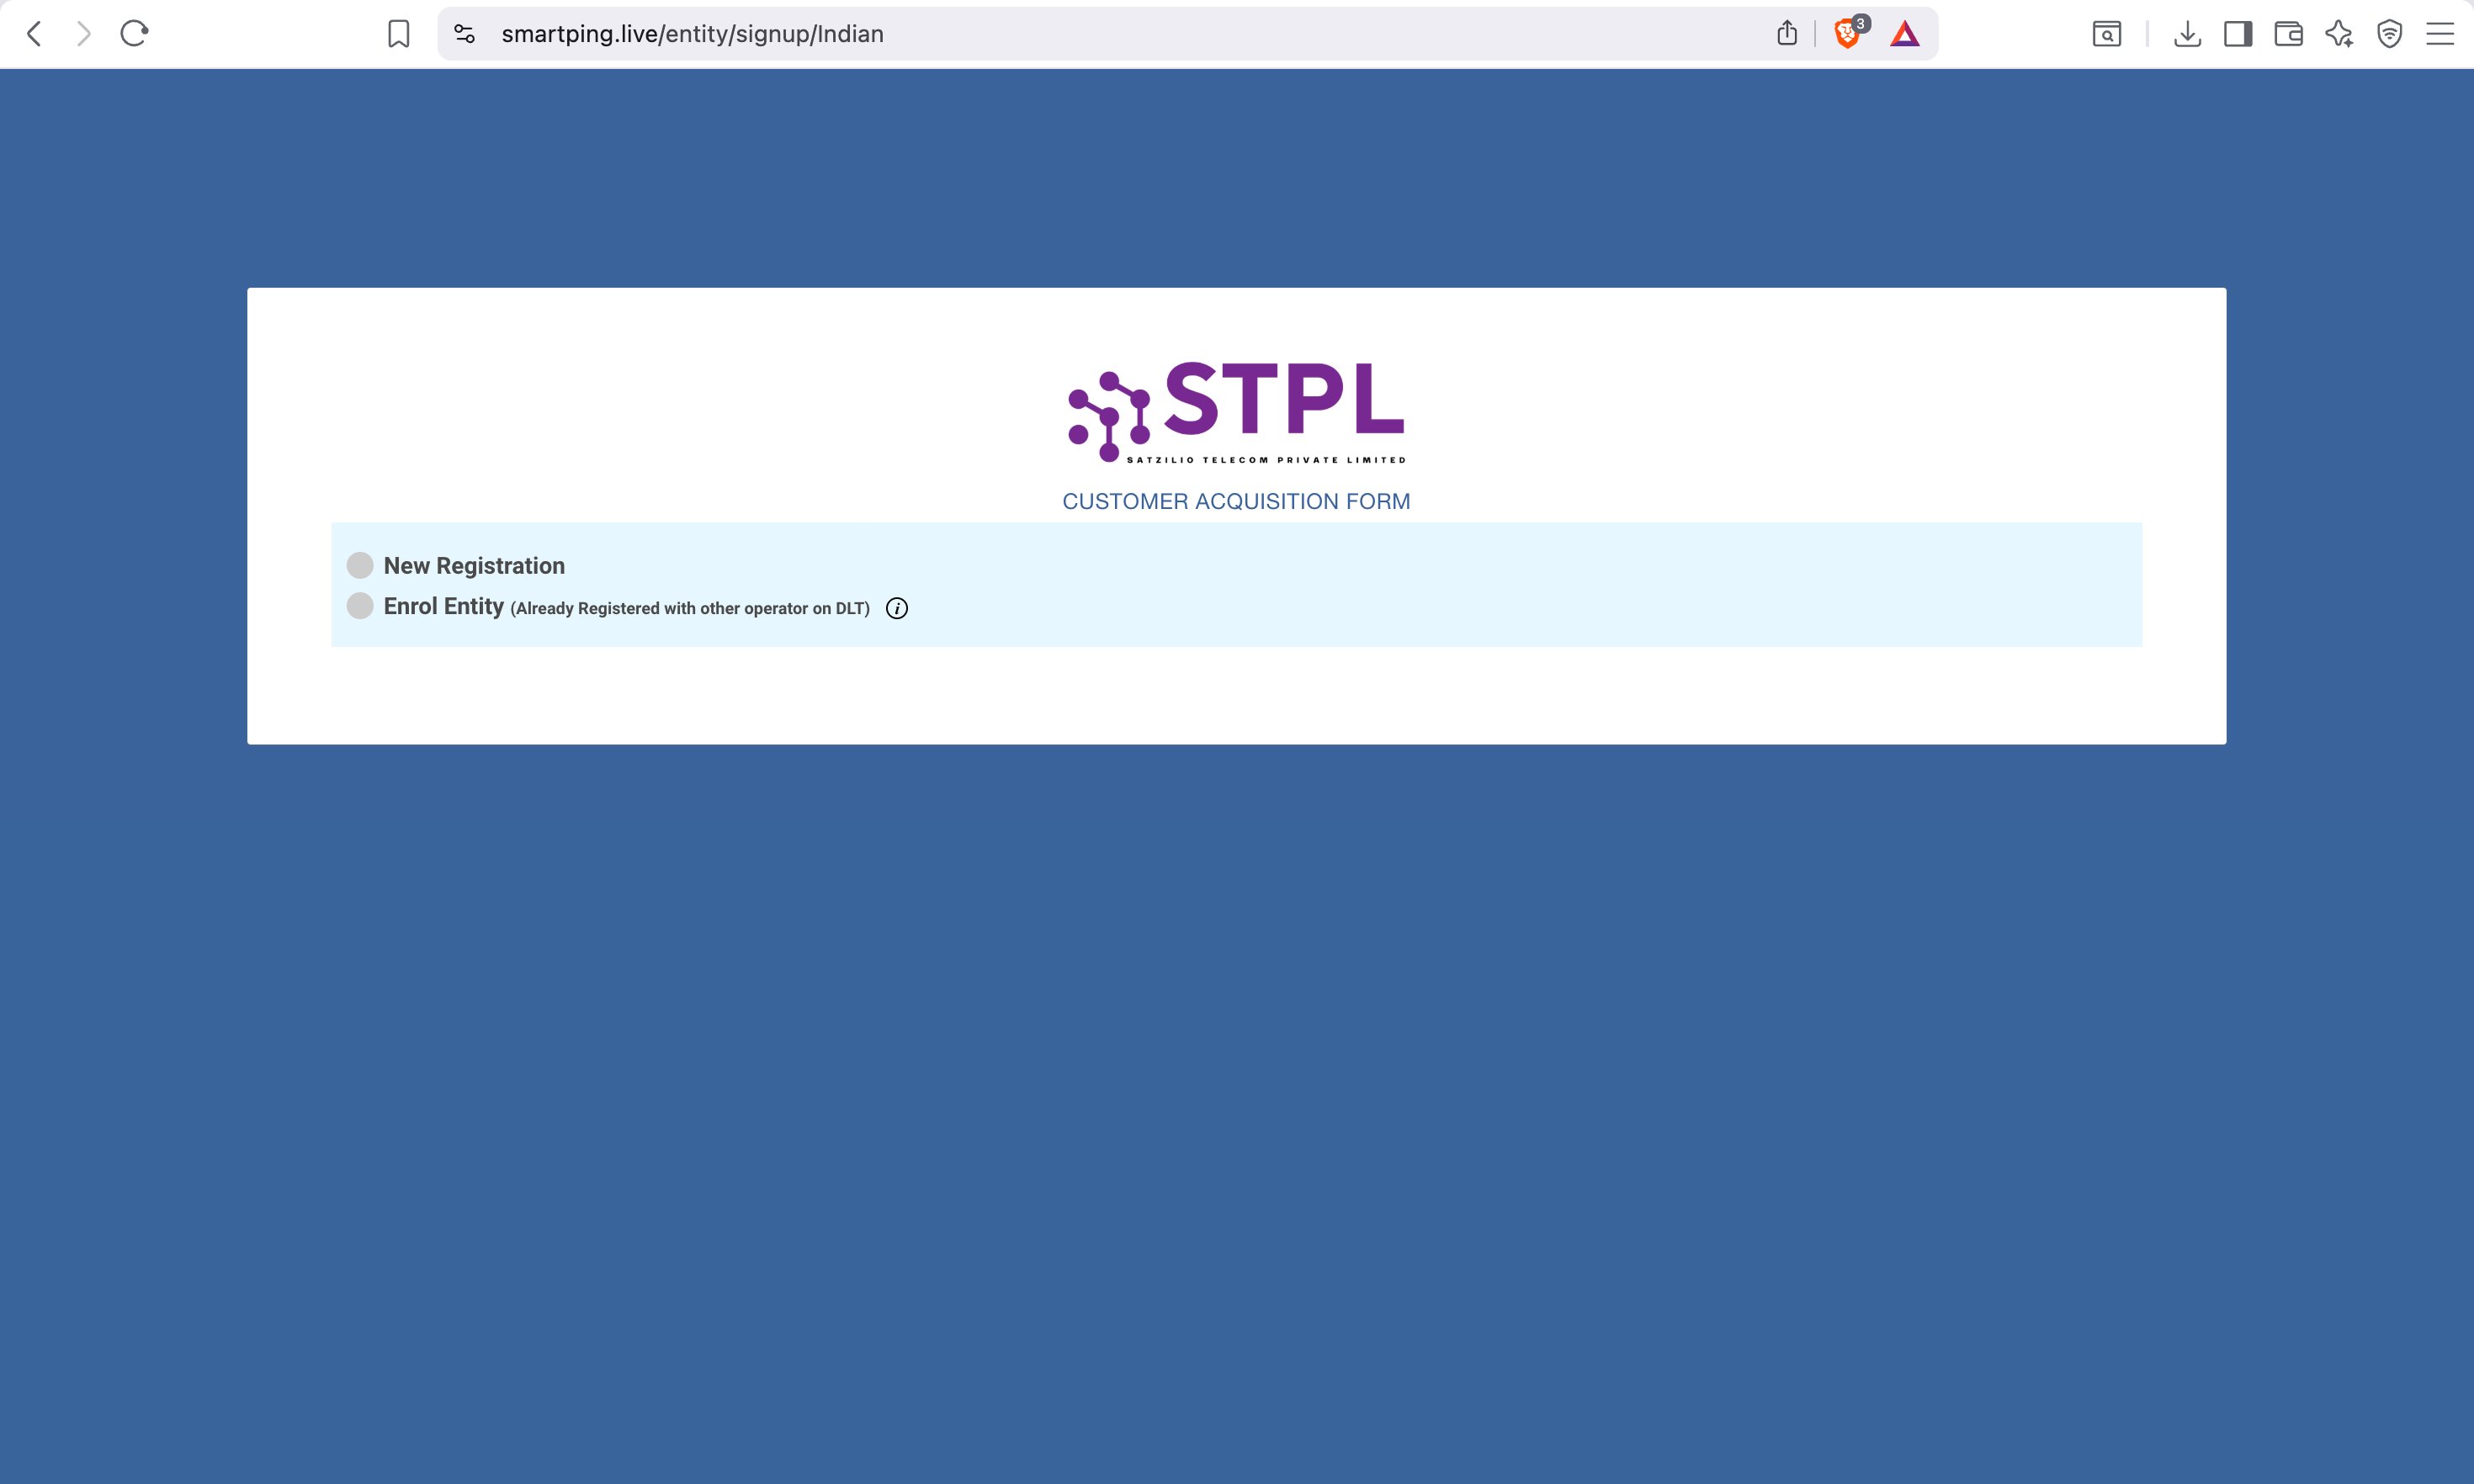
| Option | When to Select |
|---|---|
| New Registration | You have never registered on any DLT portal before — first time registration |
| Enrol Entity (Already Registered with other operator on DLT) | You are already registered on another DLT portal (Jio, Airtel, Vi, BSNL) and want to migrate/add SmartPing |
Step 4 — Fill Business Details
Fill in your complete business details in the registration form:
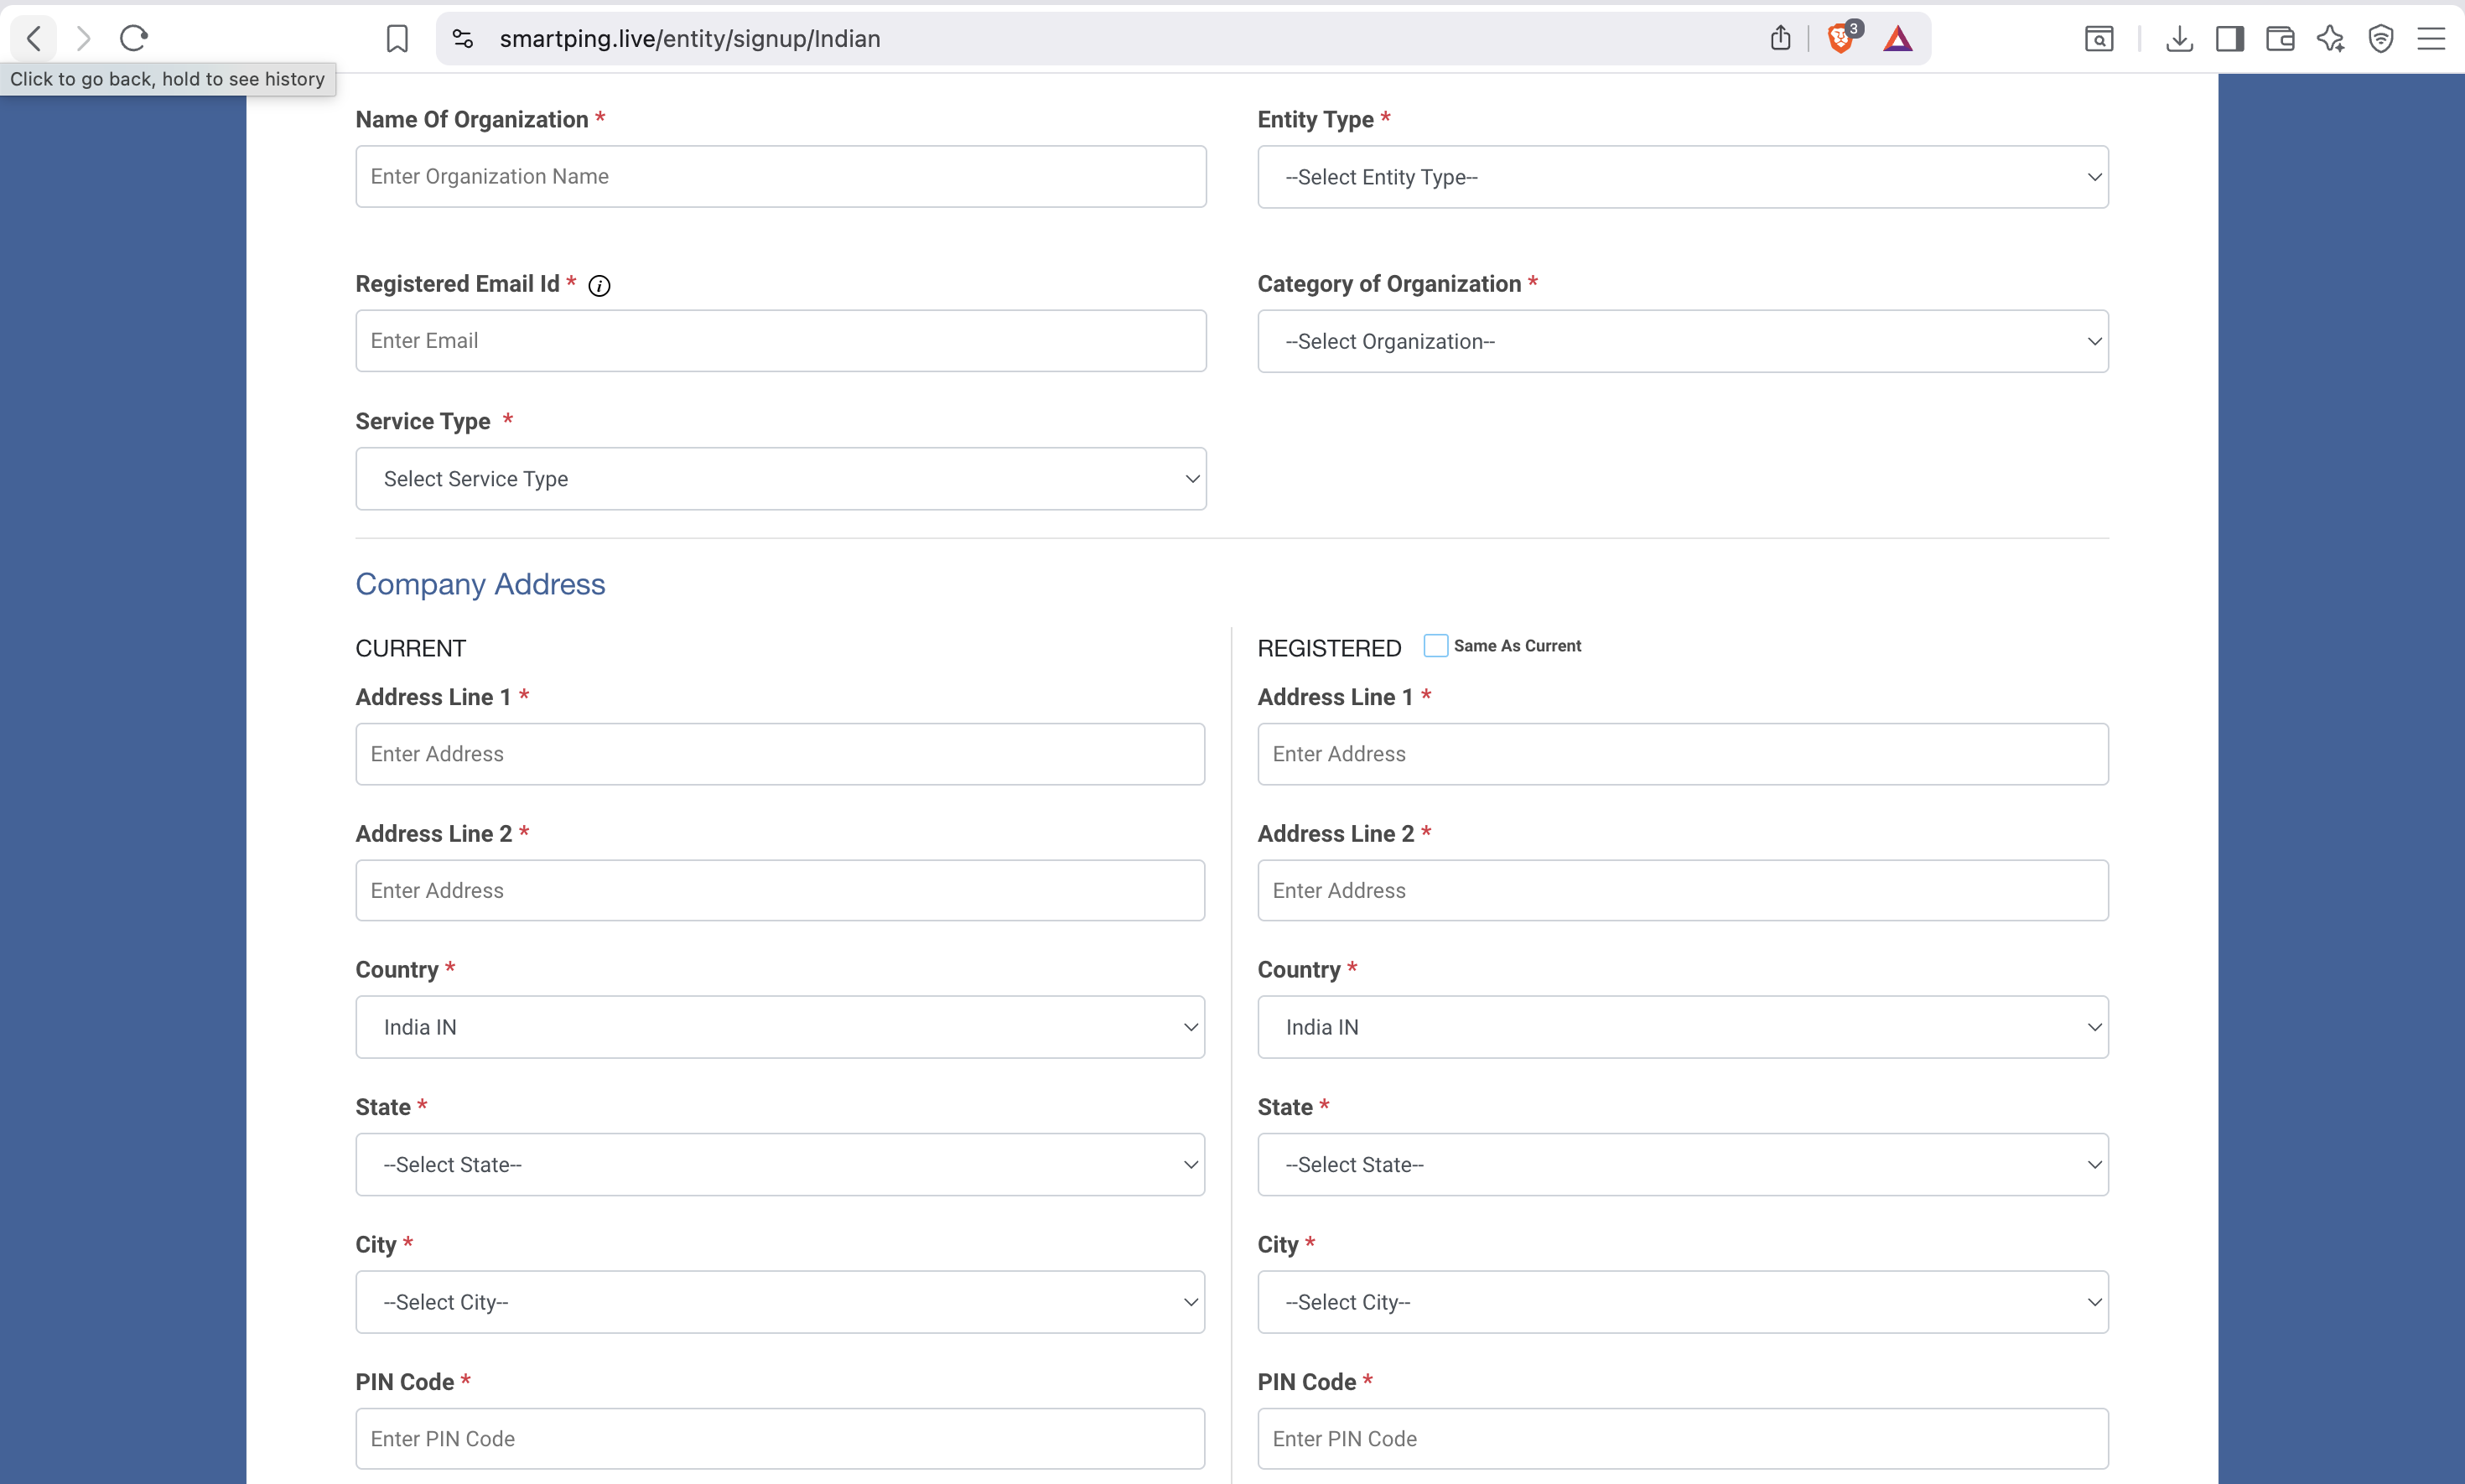
| Business Name | Legal registered name — must match your PAN/GST documents exactly |
| Email Address | Valid business email — all DLT communications will come here |
| Mobile Number | Registered mobile — will be verified via OTP |
| PAN Number | Business PAN or Proprietor PAN |
| GST Number | If GST registered (optional for non-GST businesses) |
| Registered Address | Complete business address as per documents |
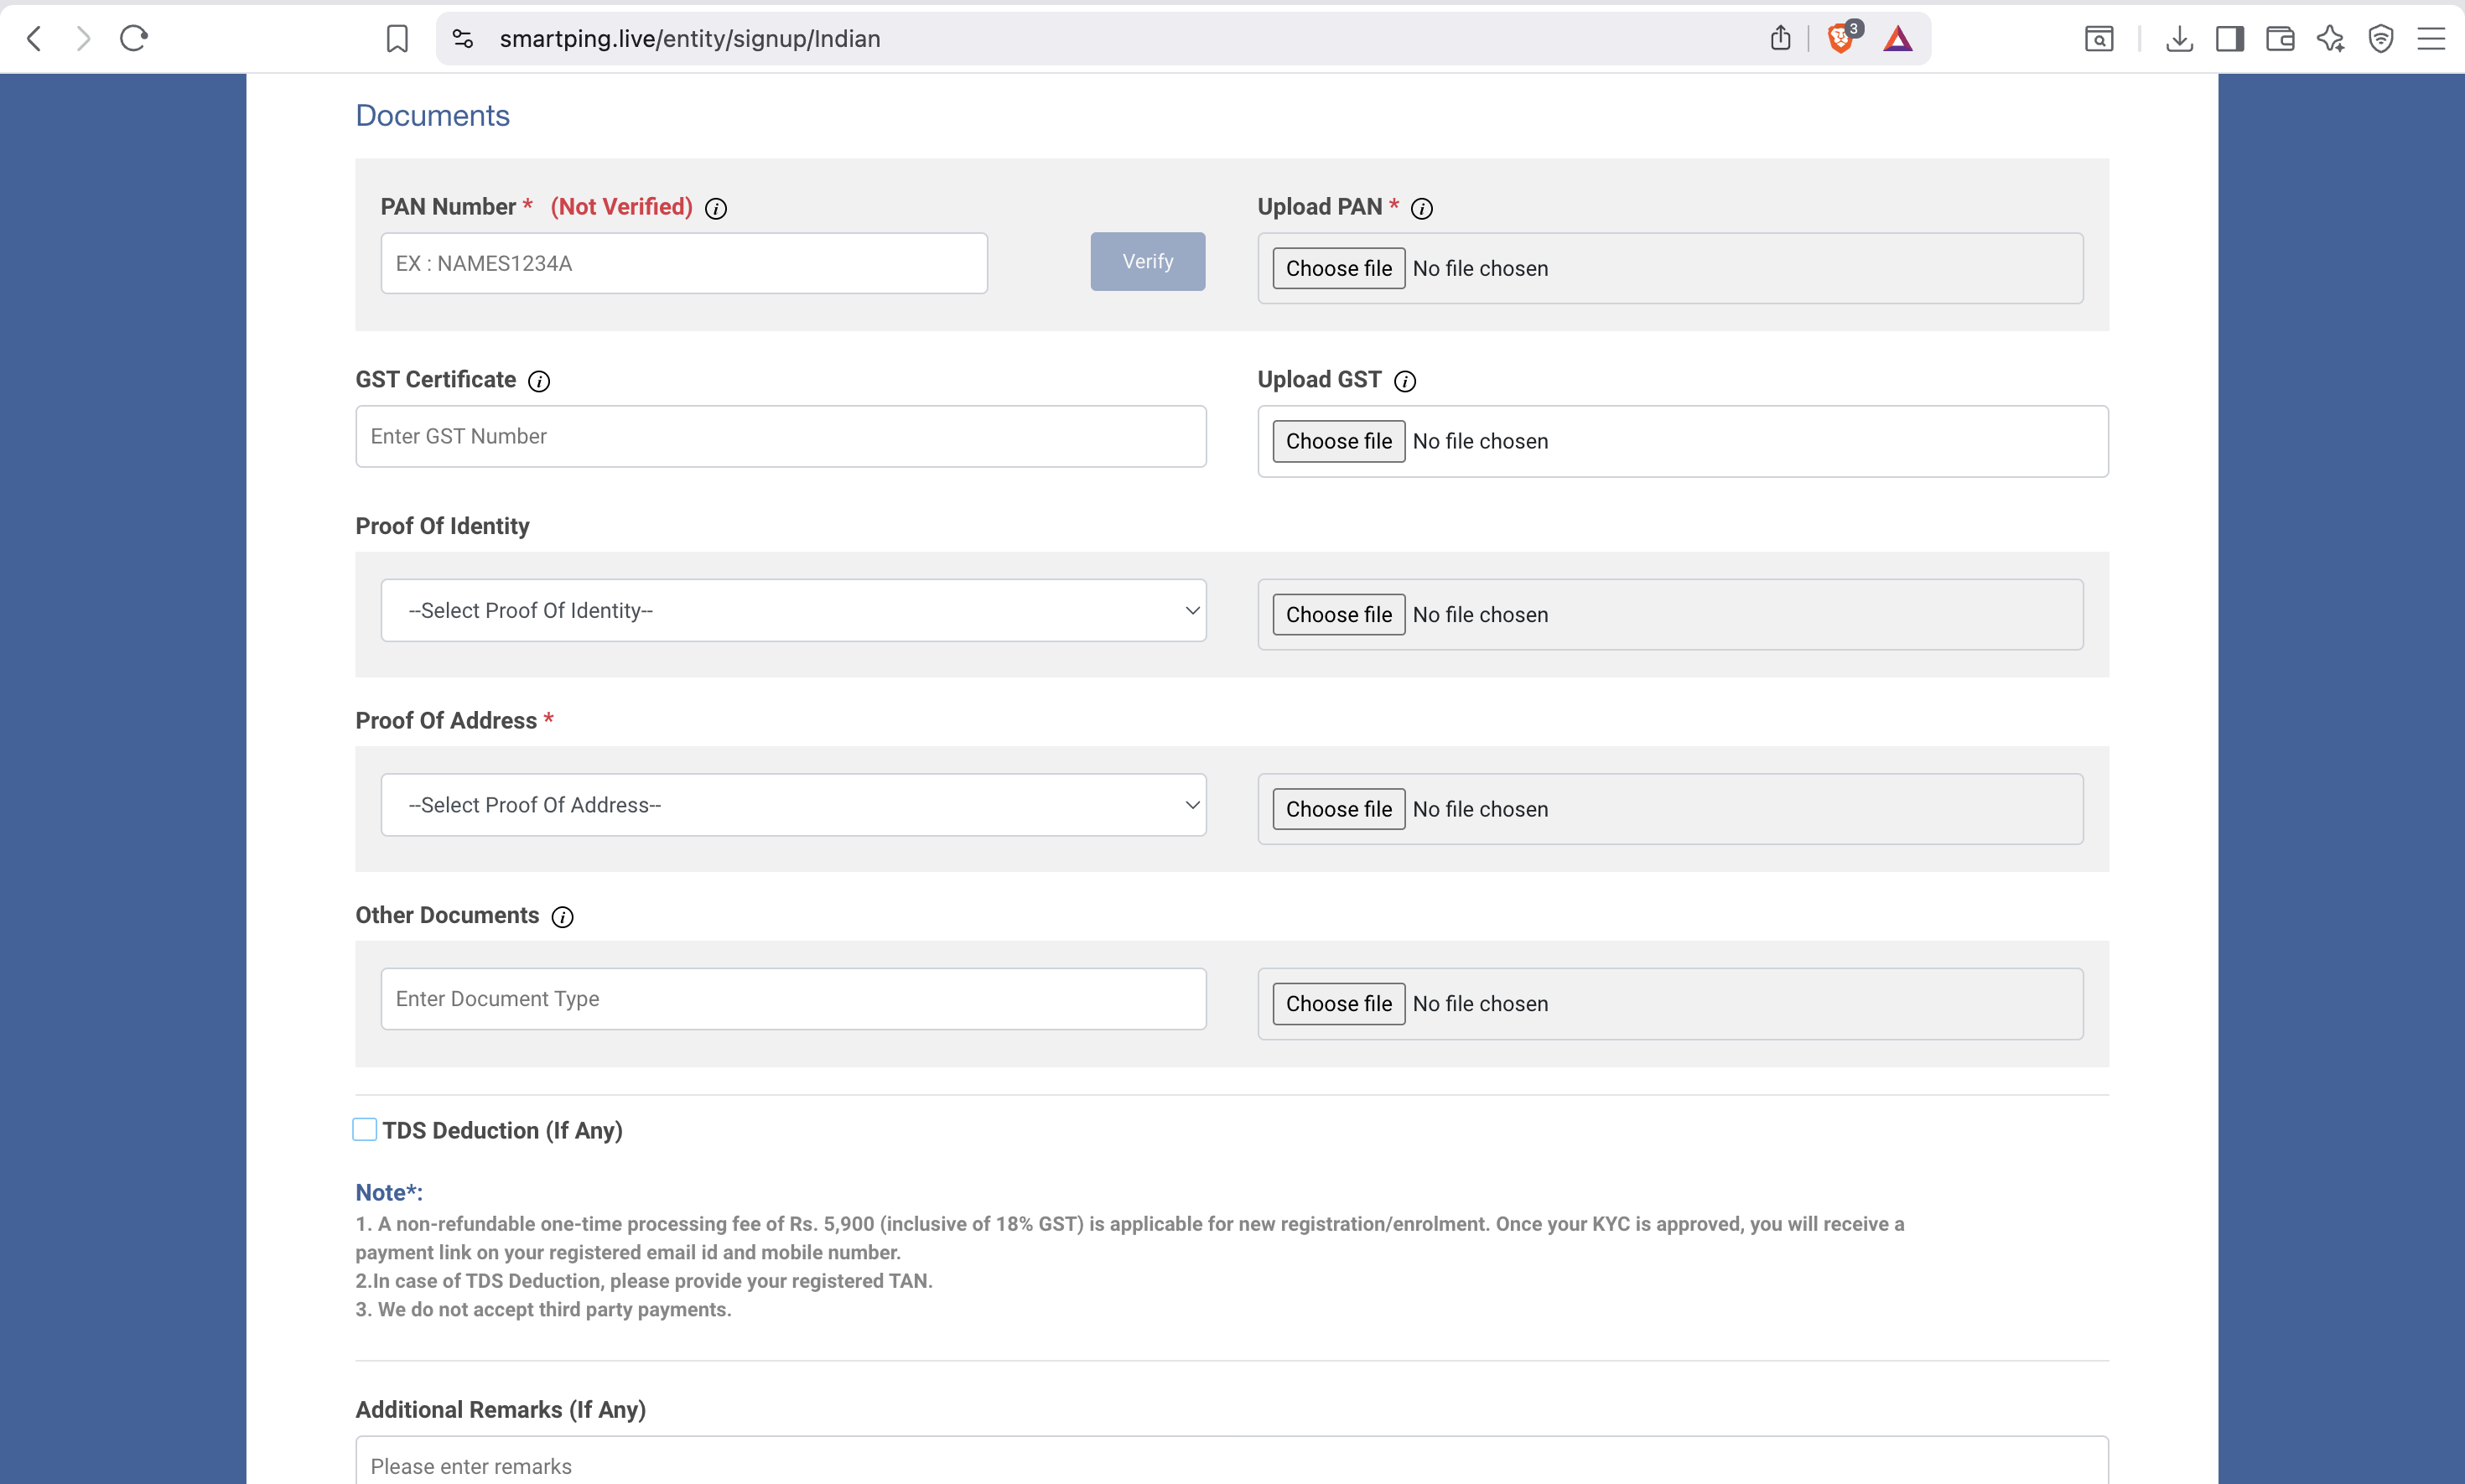
Step 5 — Upload Documents & Complete KYC
Upload the required documents based on your entity type. See the Documents Required guide → for the full checklist.
Step 6 — Submit & Pay Registration Fee
Submit your application. Pay the DLT registration fee of ₹5,000 + 18% GST online (UPI, net banking, or card). Entity approval typically takes 24–48 hours. Once your KYC is completed, the DLT operator will send a payment link to your registered contact information (email/mobile). Complete the payment through the provided link to activate your DLT registration.
Need help with Entity Registration?
Nesark's DLT experts guide you through the entire registration process — document preparation, form filling & follow-up.
DLT Header (Sender ID) Registration — Step-by-Step Guide
A Header (also called Sender ID) is the 6-character alphanumeric name that appears as the SMS sender — e.g. NESARK, ICICIB, AMAZON. Every header must be registered and approved on SmartPing DLT before sending any SMS.
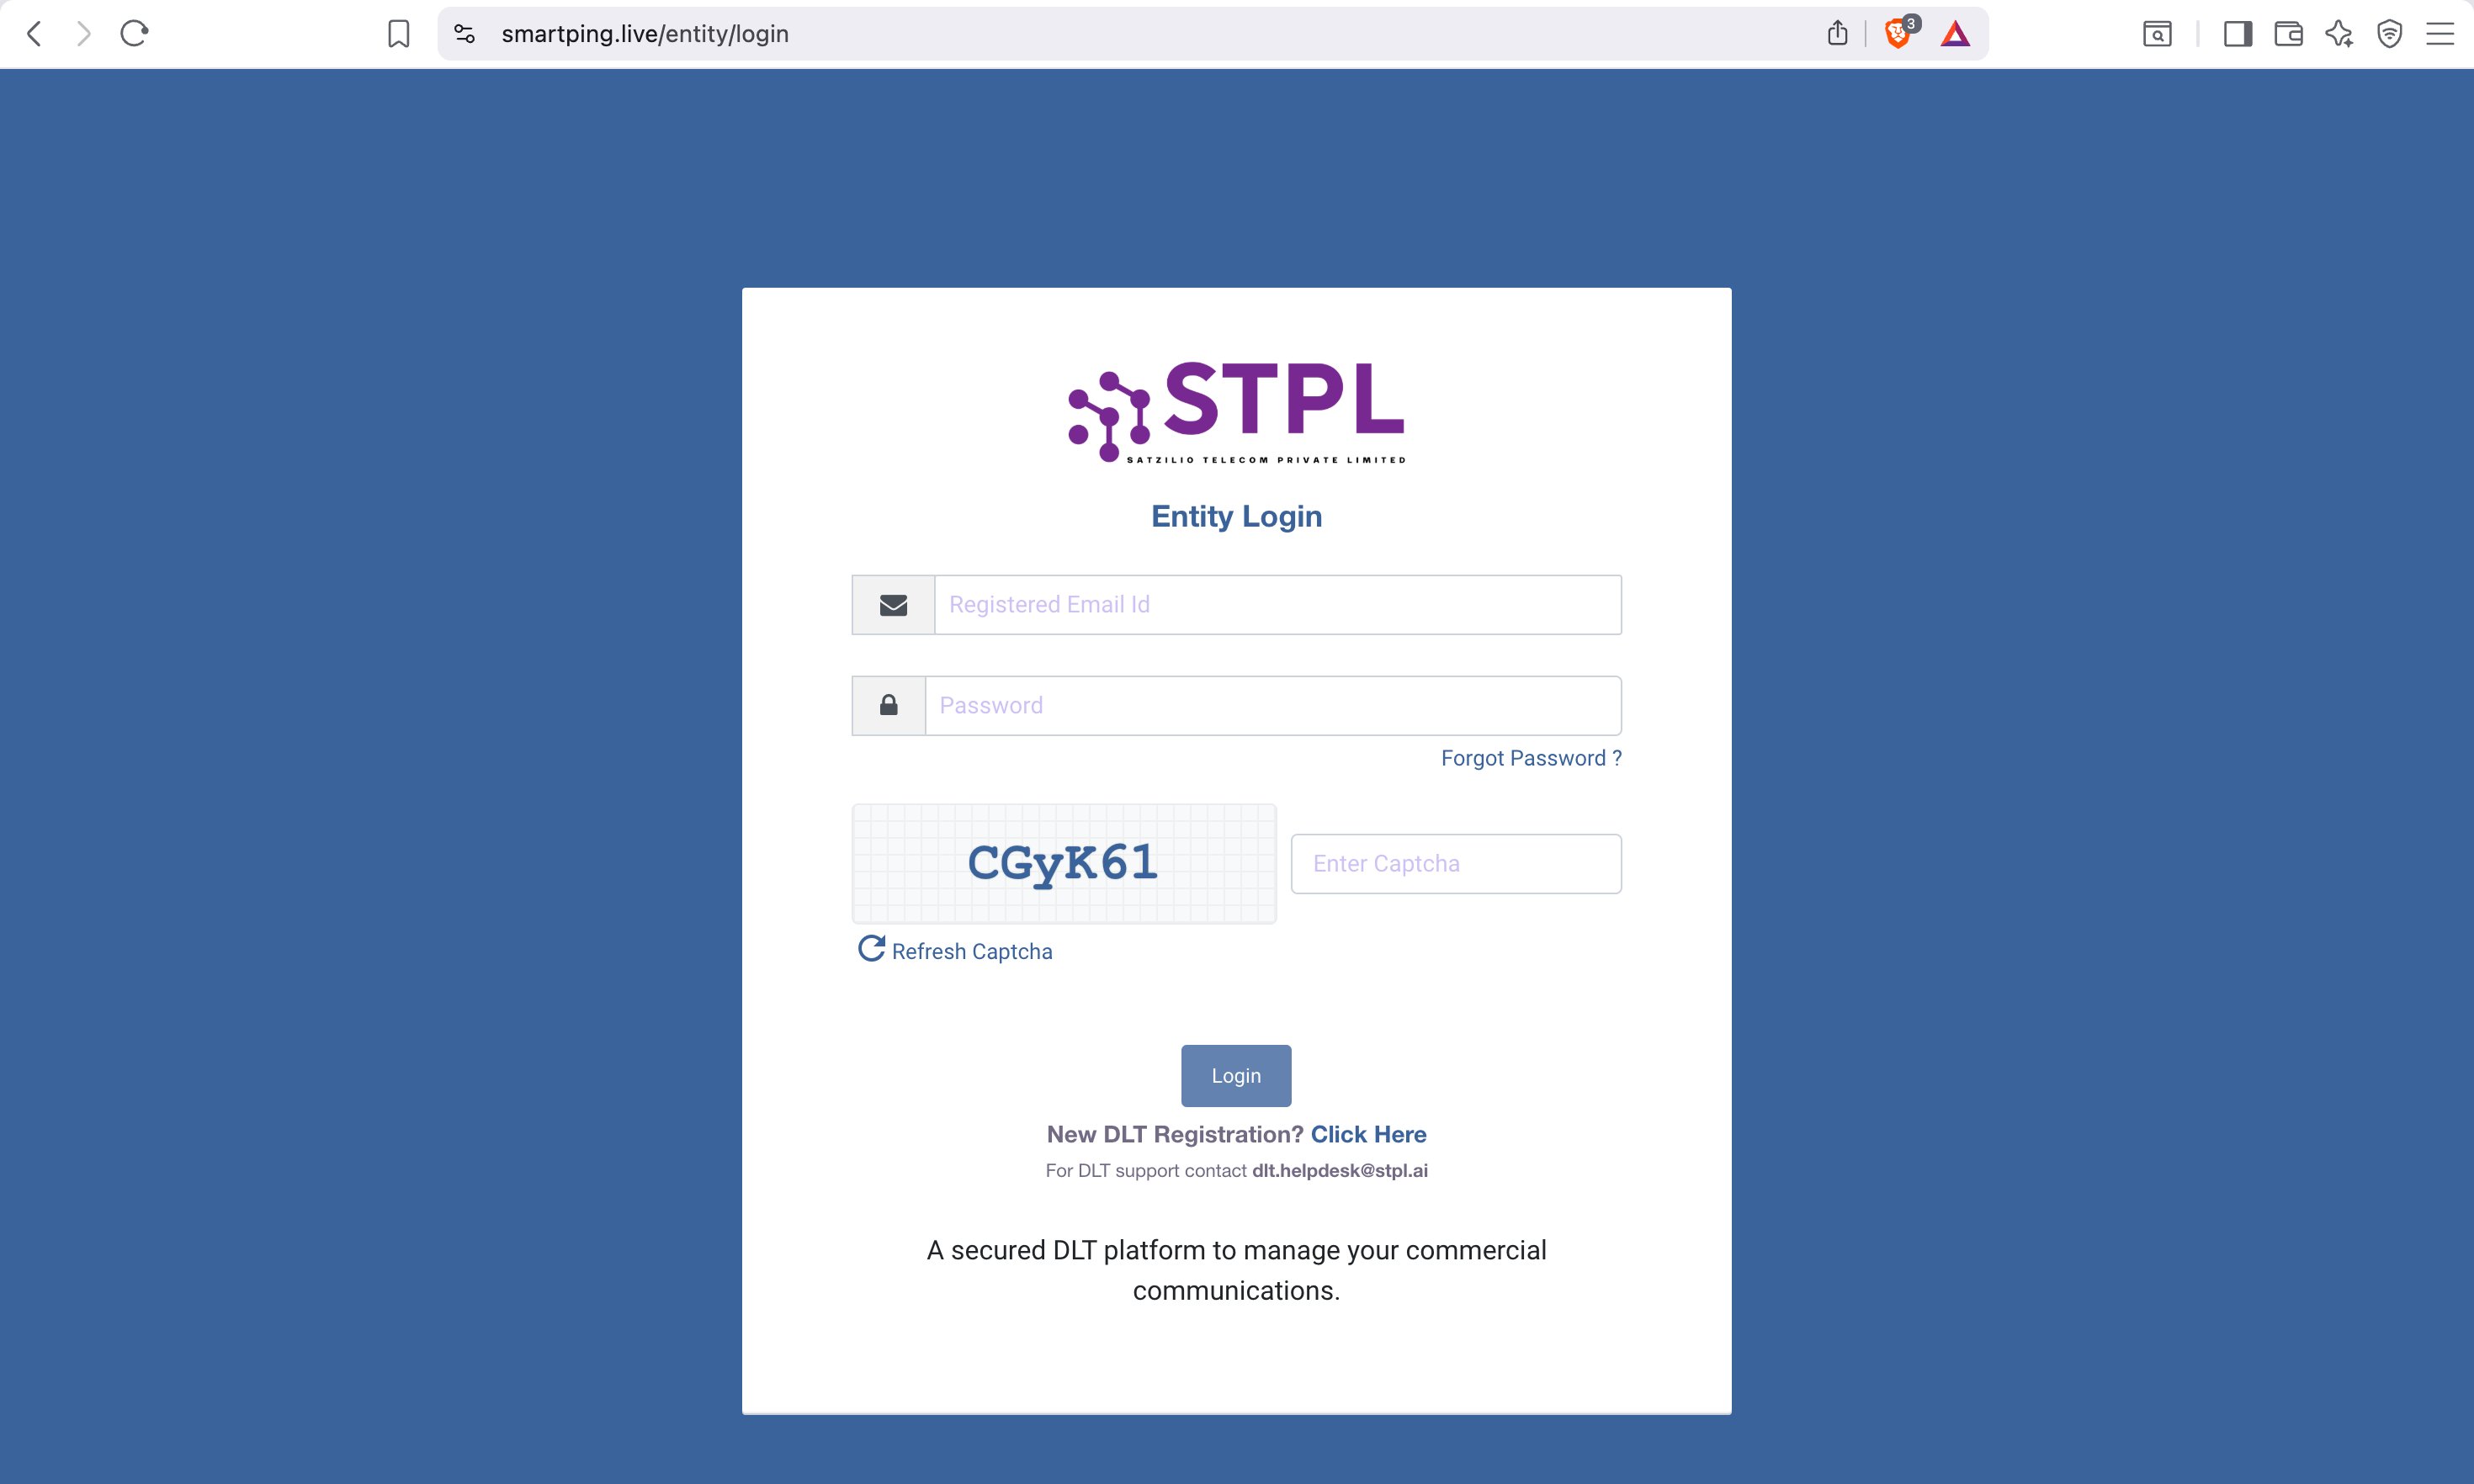
Step 1 — Login to SmartPing Portal
Visit smartping.live/entity/login. Enter your Registered Email ID, Password, solve the Captcha, then click Login.
Step 2 — Go to Header Section
In the left navigation panel, click "Header". Then click the "New Header" button to open the Header Registration form. You will see the form on the left and an Availability Checked Header table on the right.
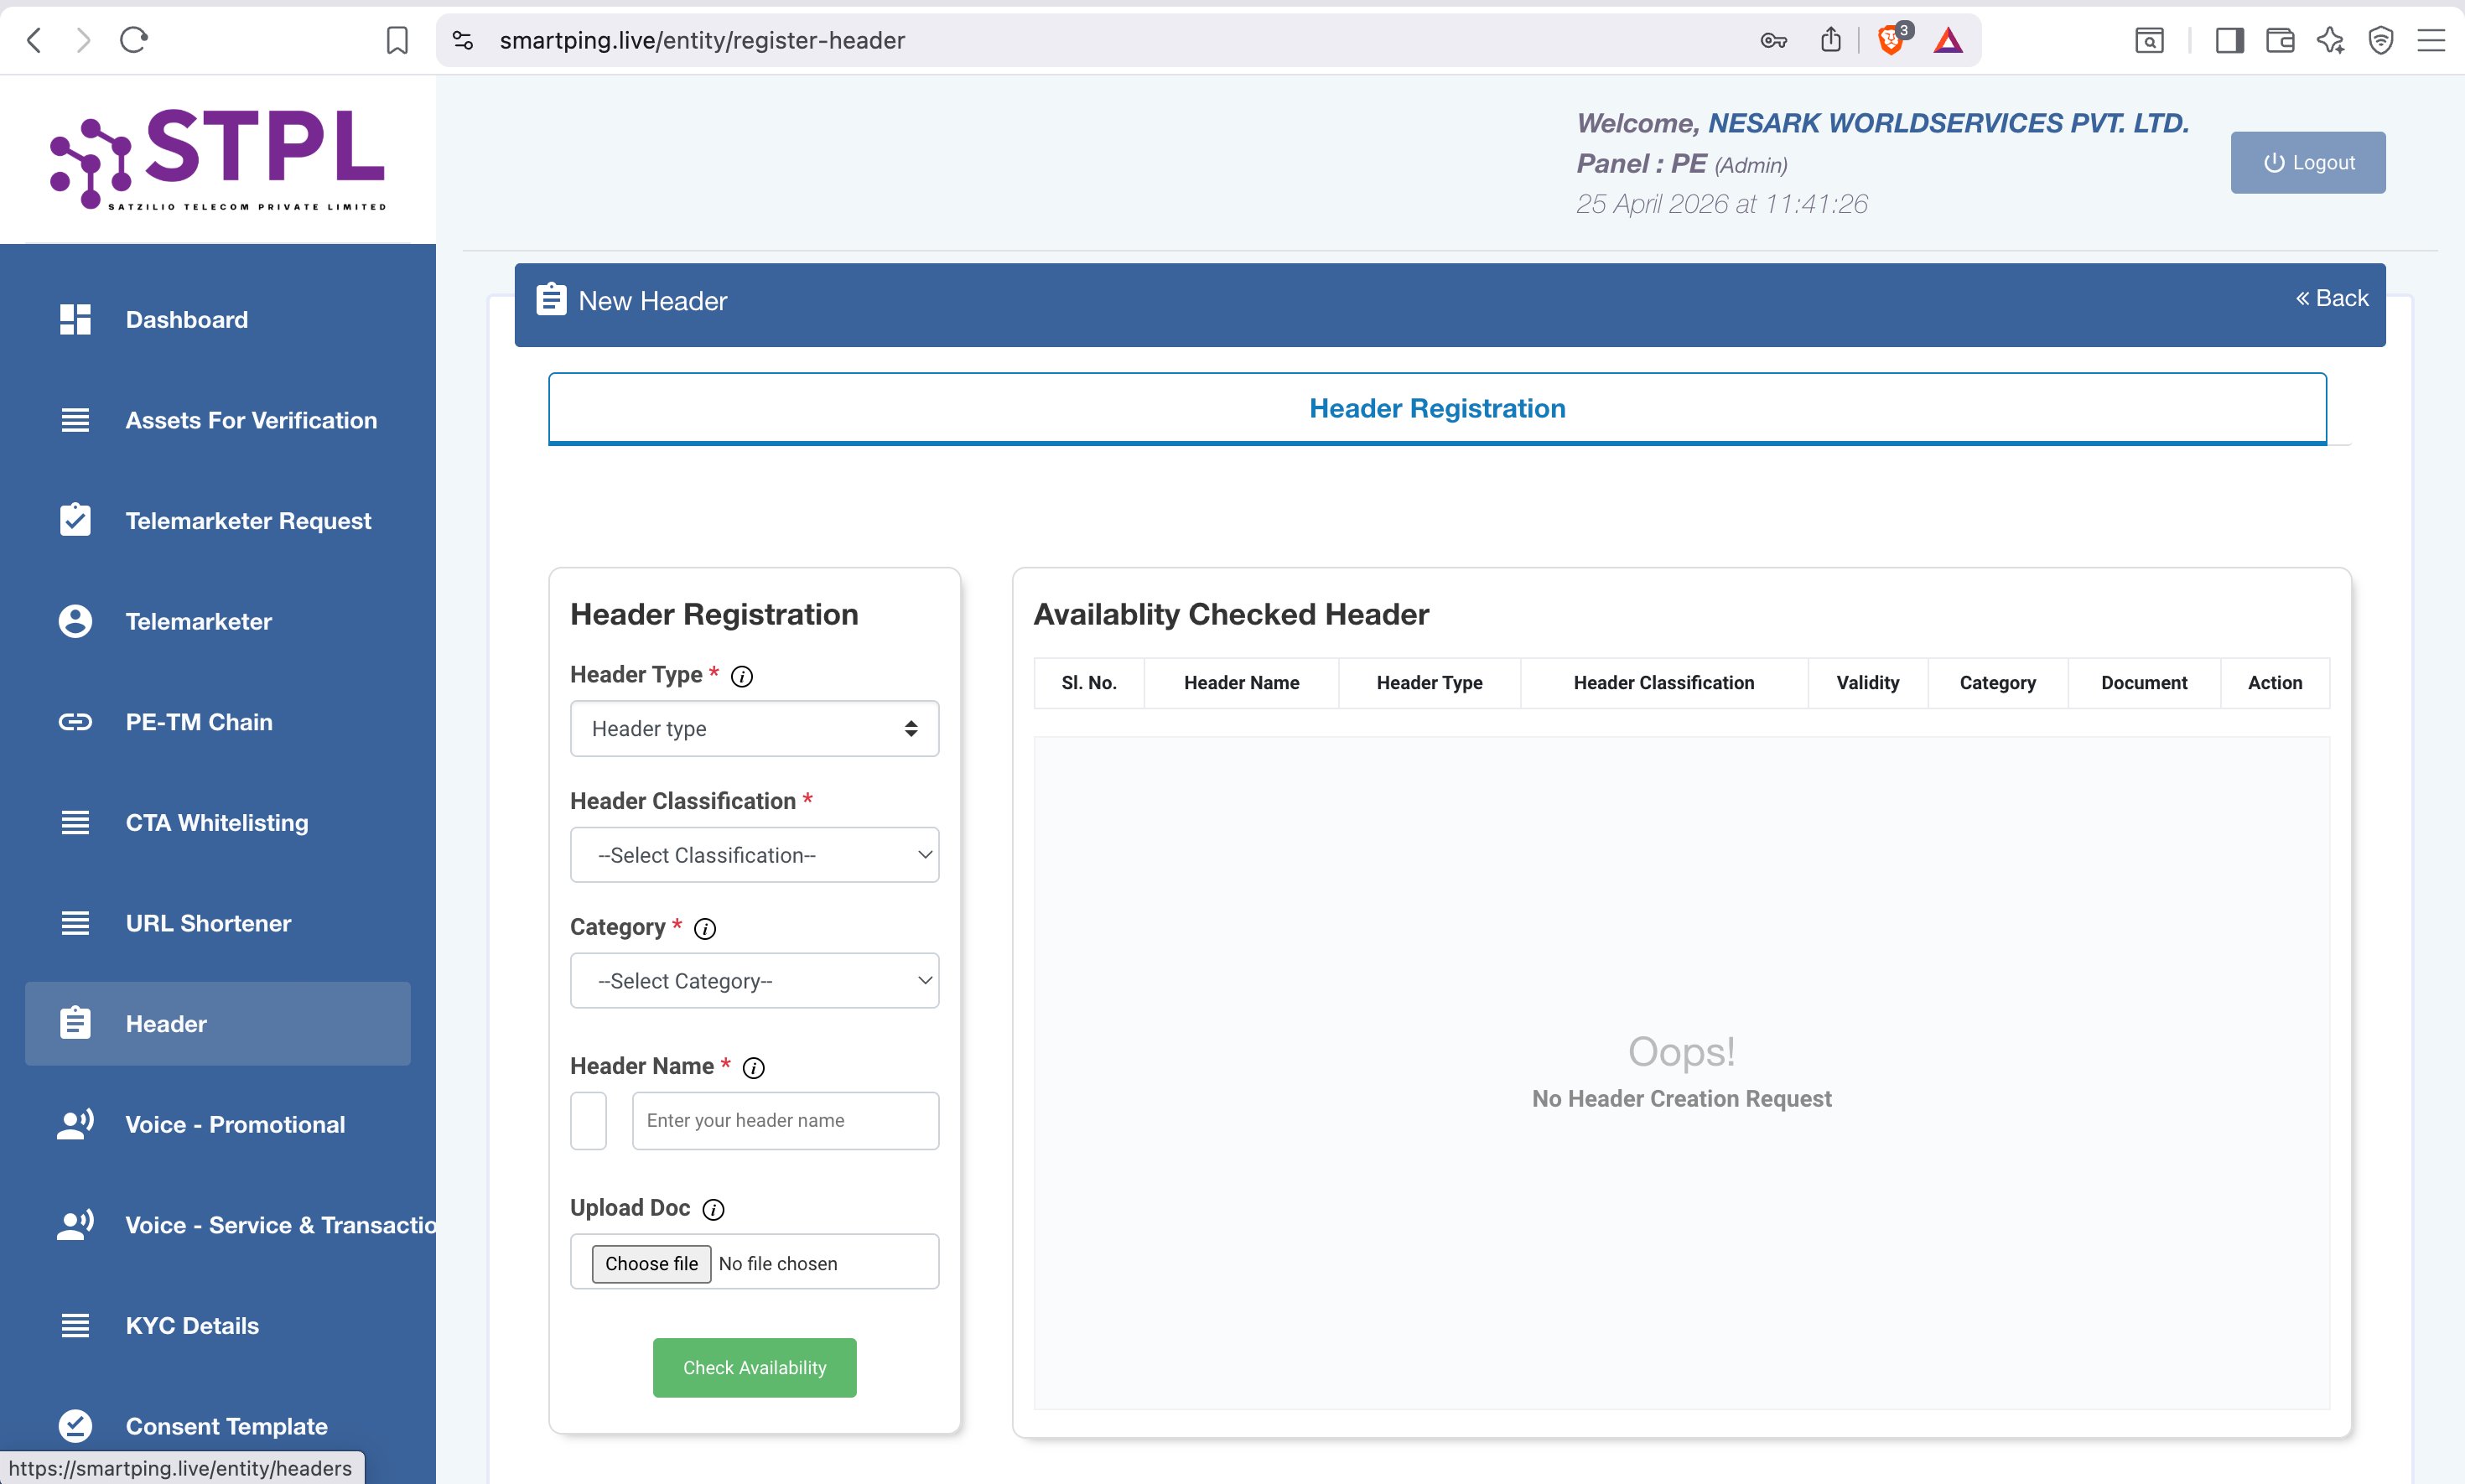
Step 3 — Fill the Registration Form
Click the Header Type dropdown. You will see exactly 2 options:
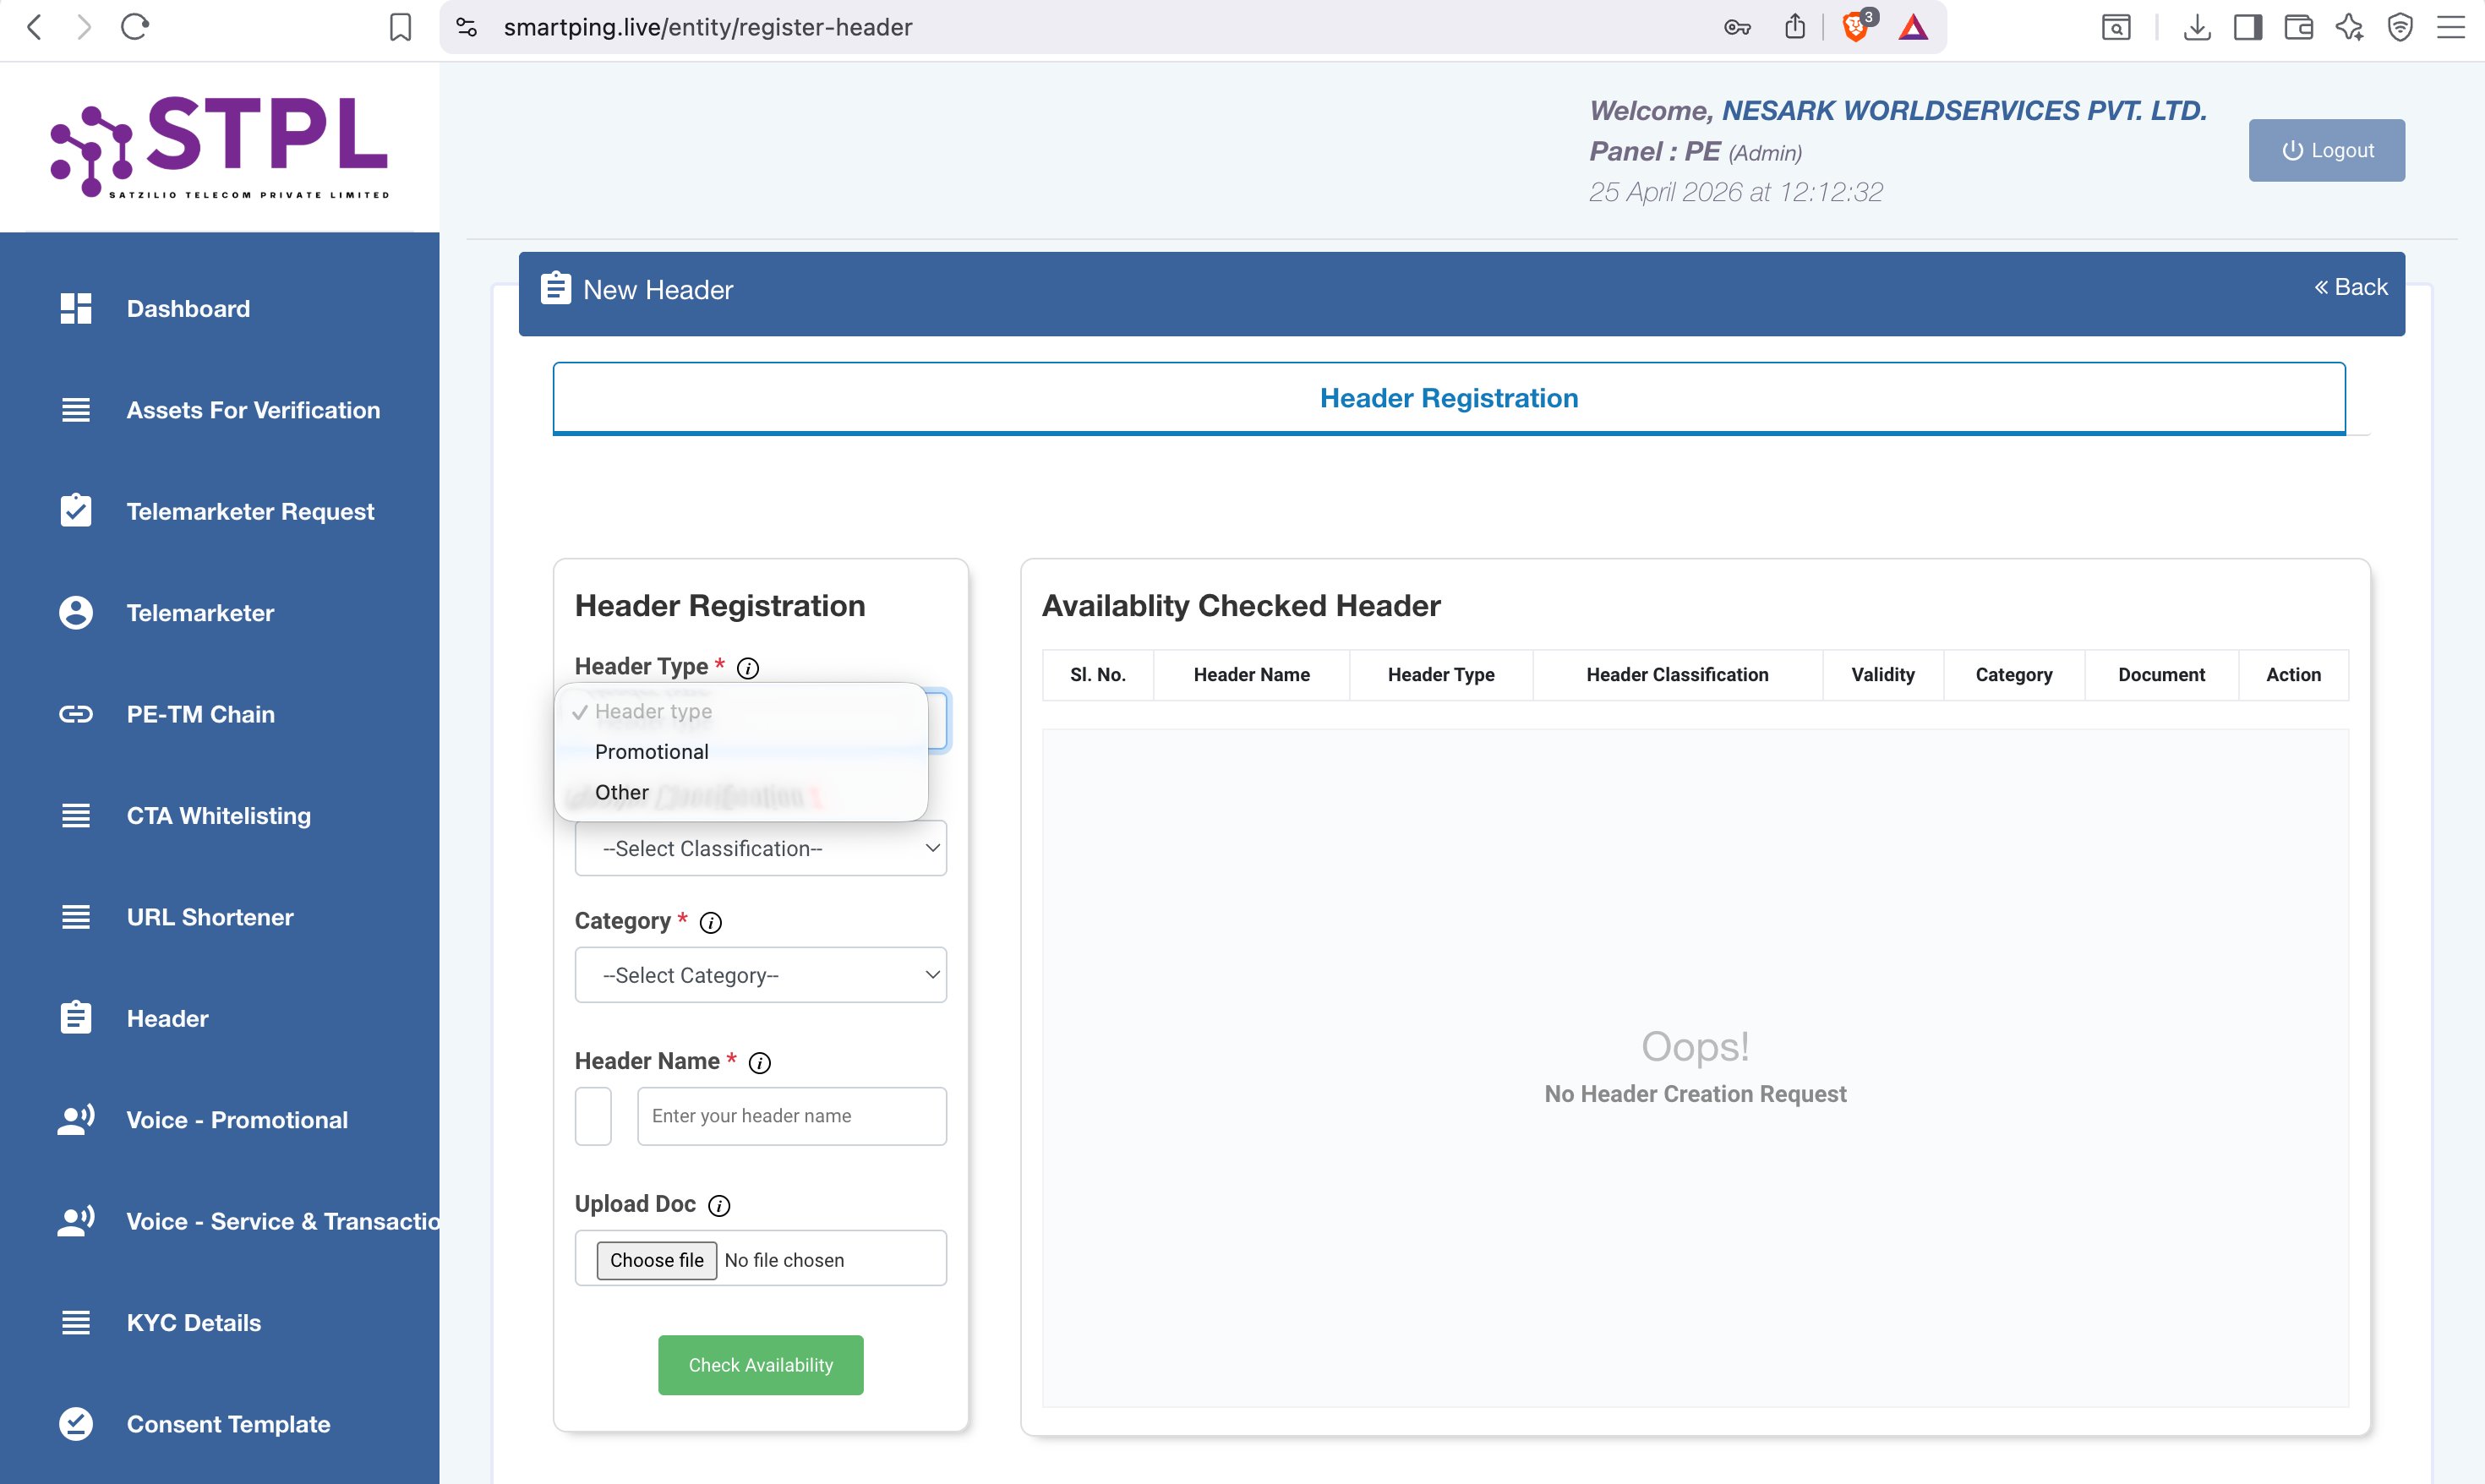
| Option | Select When |
|---|---|
| Promotional | You want to send marketing/promotional SMS (10AM–9PM, non-DND only) |
| Other | You want to send Transactional or Service SMS — OTPs, order alerts, notifications (24×7, all numbers) |
Click the Header Classification dropdown. You will see 2 options:
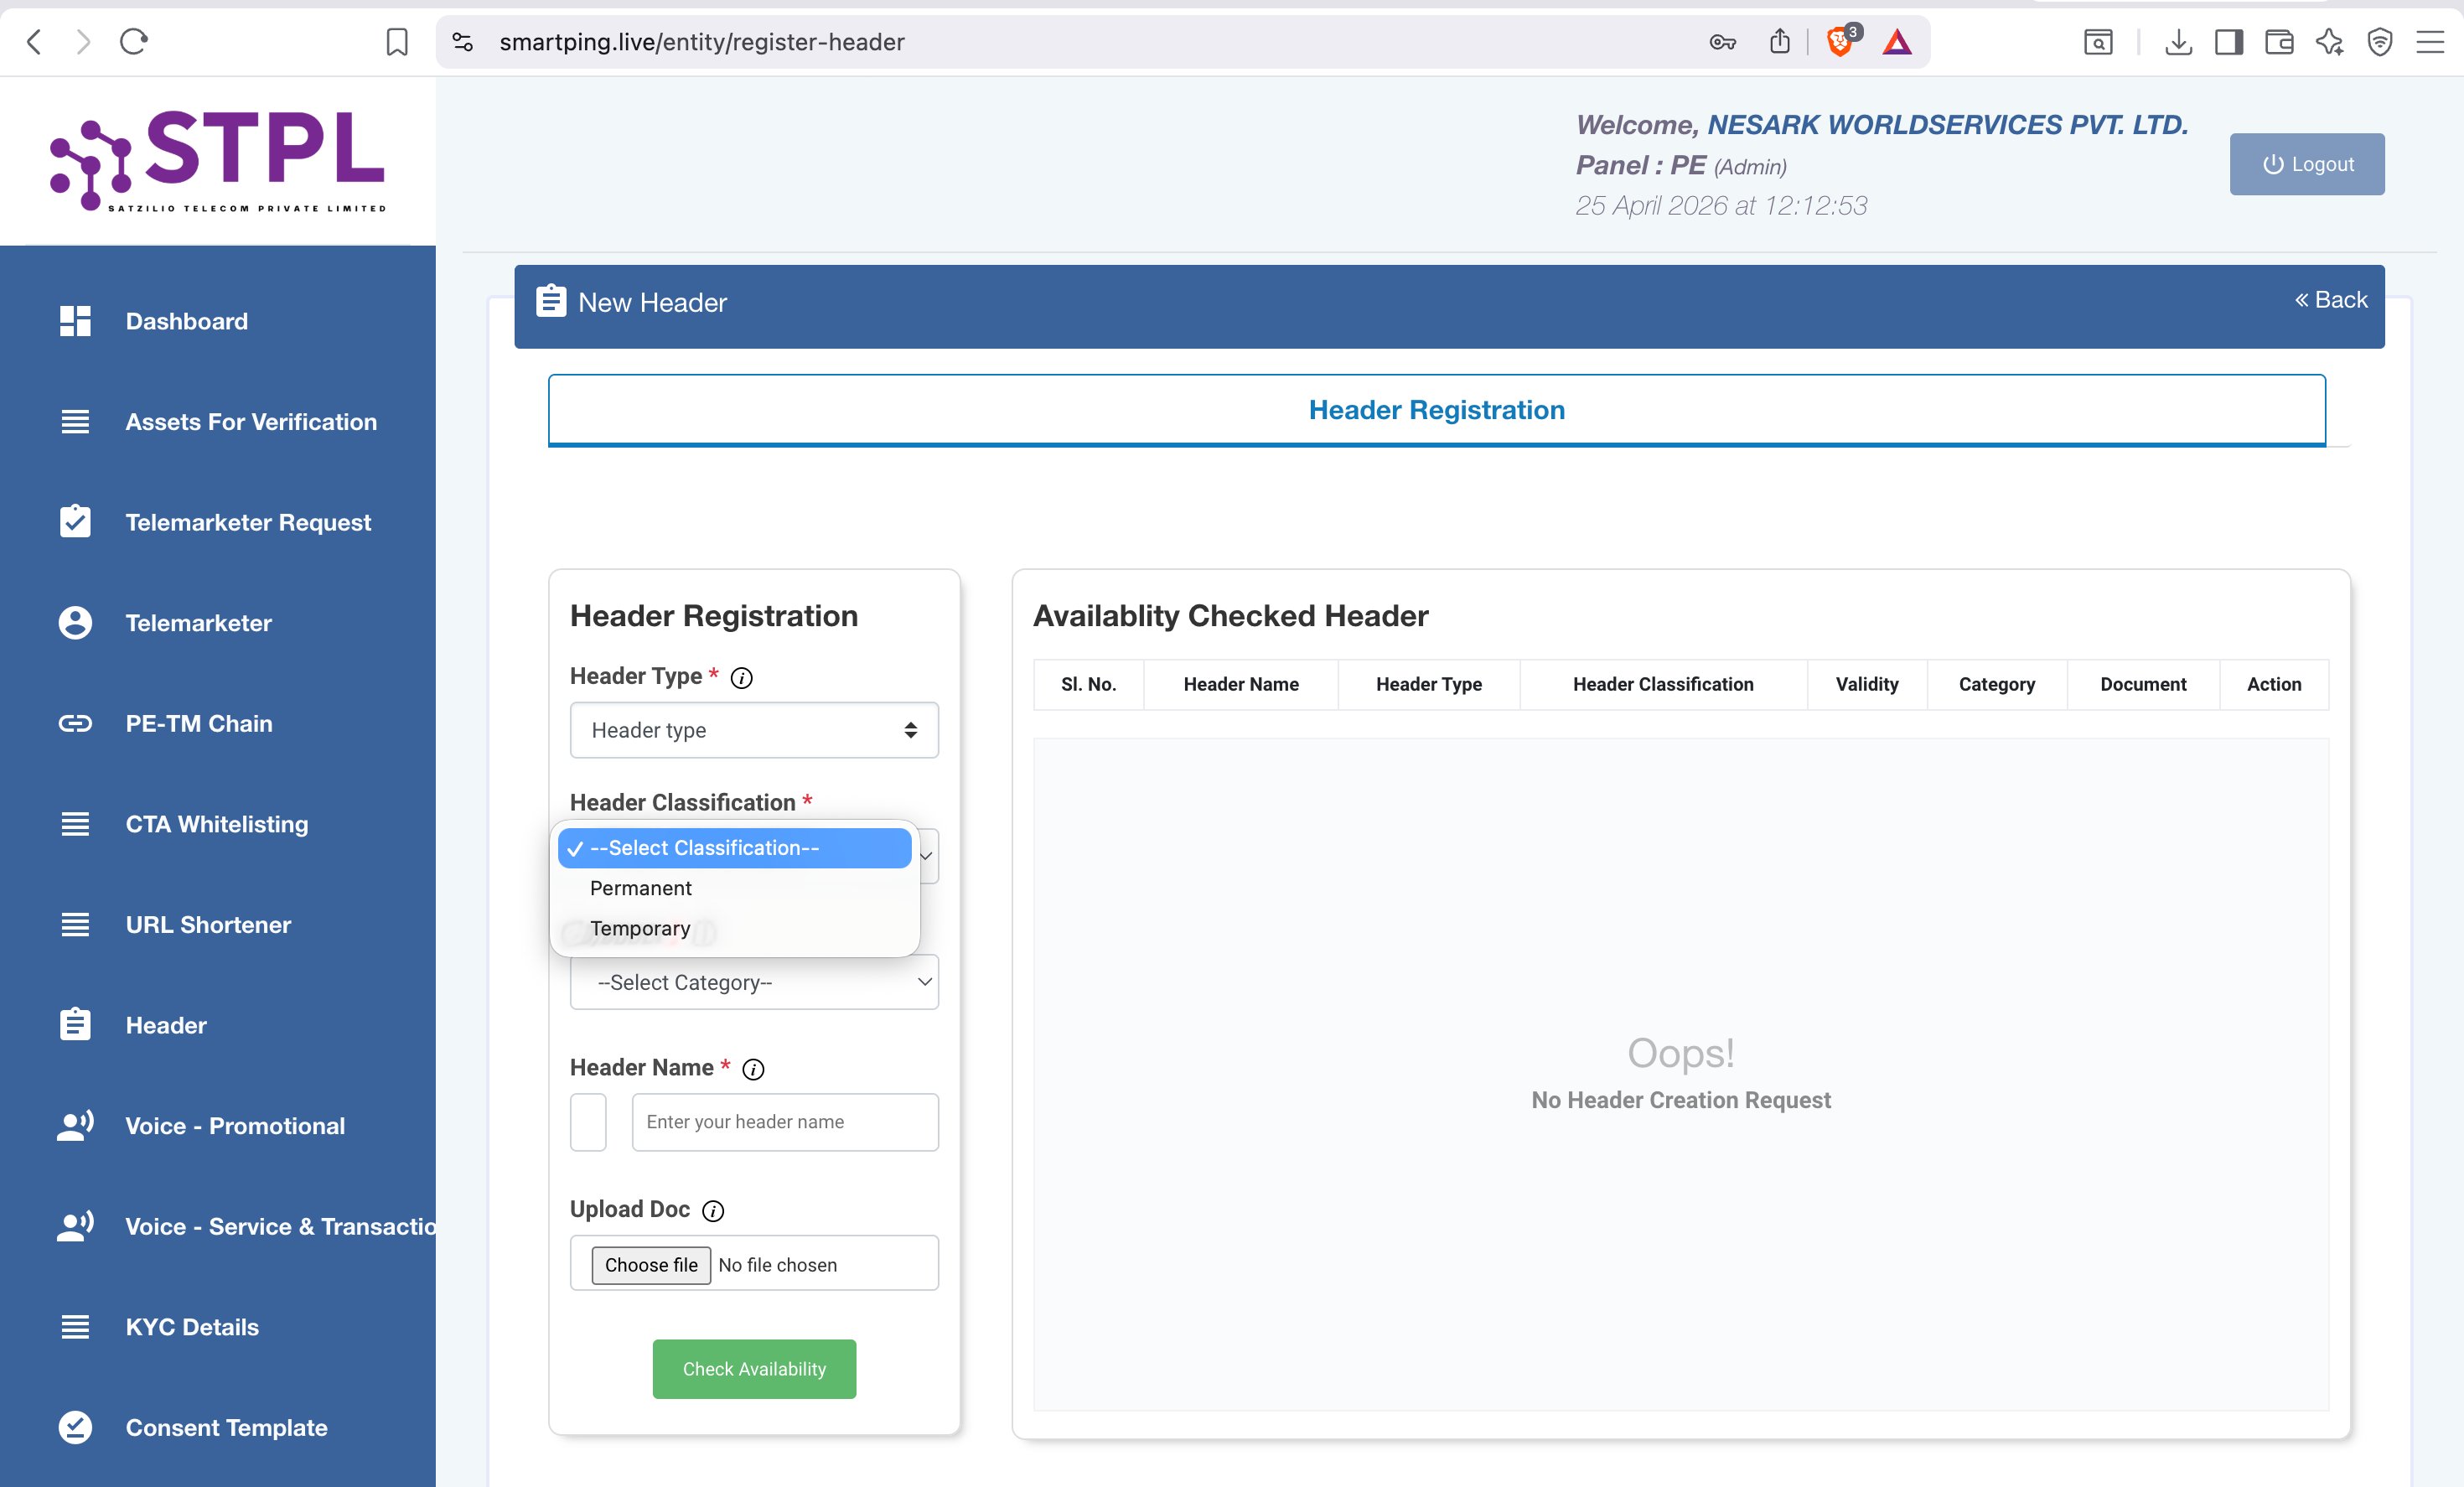
| Option | Select When |
|---|---|
| Permanent | Your business will use this header long-term — select this in most cases |
| Temporary | Short-term campaigns or event-specific use only |
Click the Category dropdown and select the industry that best matches your business:
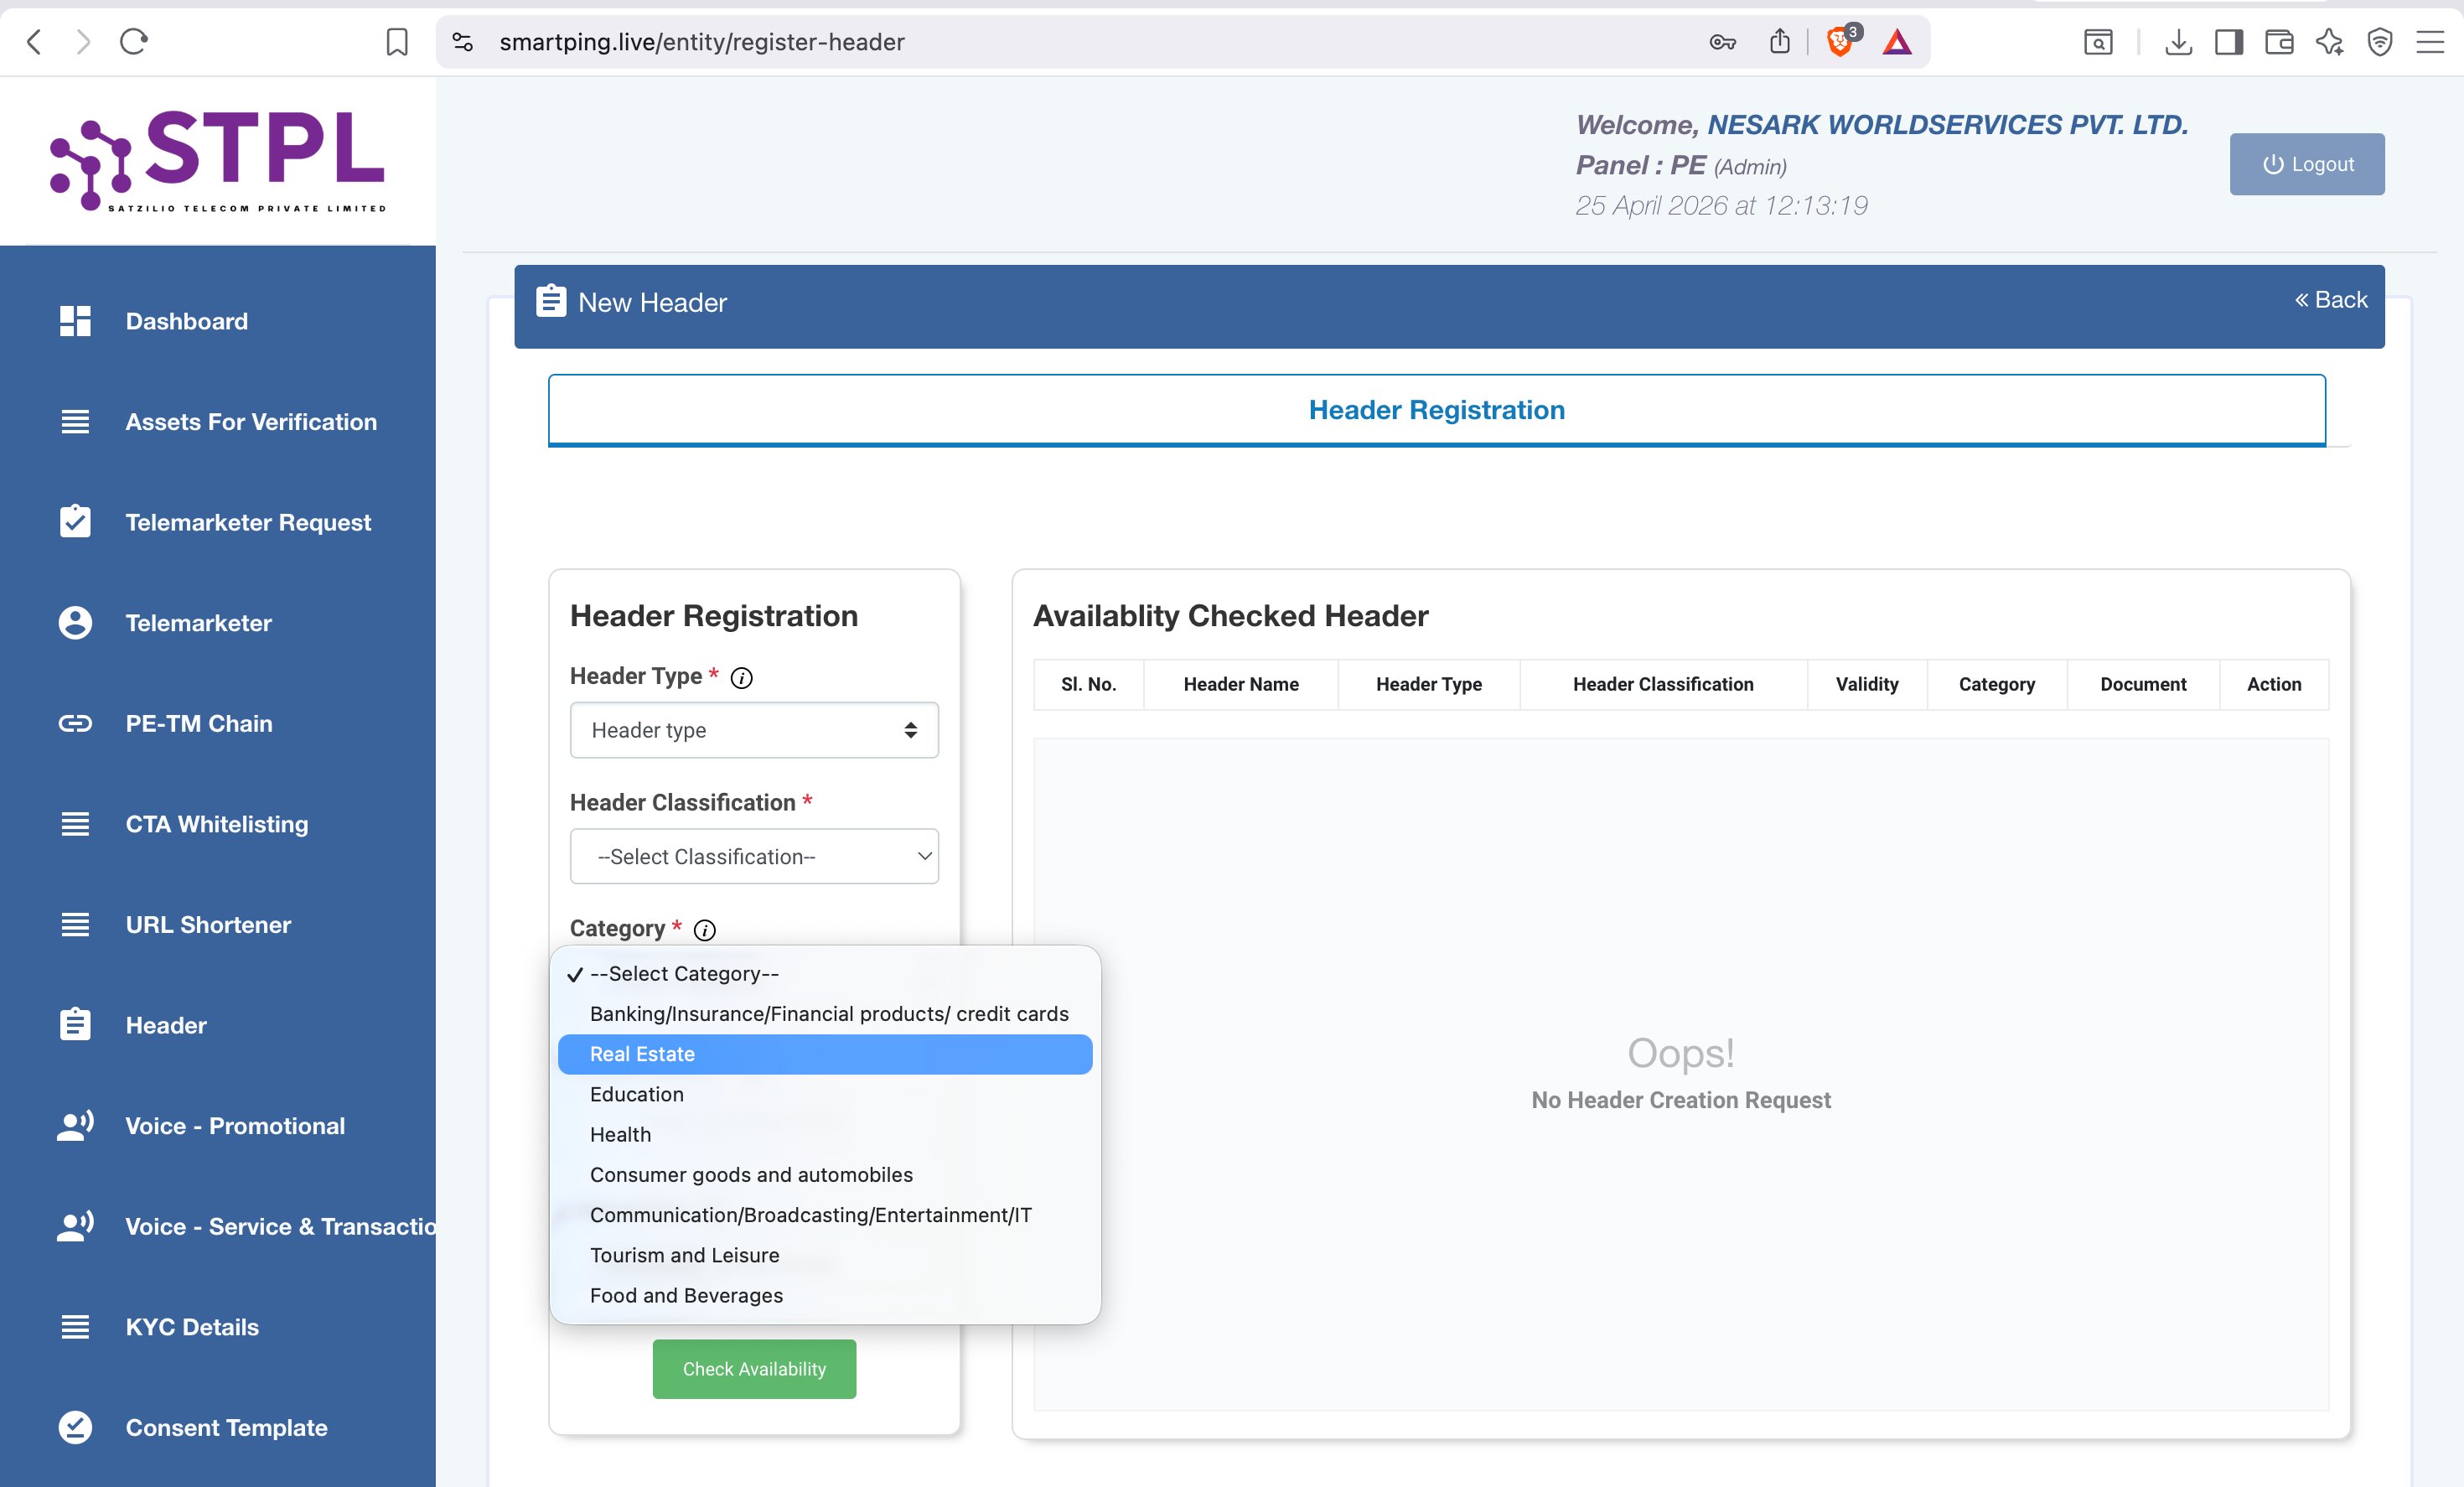
| Category | Who Should Select |
|---|---|
| Banking/Insurance/Financial products/credit cards | Banks, NBFCs, insurance companies, fintech |
| Real Estate | Builders, brokers, property portals |
| Education | Schools, colleges, EdTech, coaching institutes |
| Health | Hospitals, clinics, pharma, health apps |
| Consumer goods and automobiles | FMCG, retail, automobile dealers |
| Communication/Broadcasting/Entertainment/IT | Telecom, software companies, media, IT services |
| Tourism and Leisure | Travel agencies, hotels, OTAs |
| Food and Beverages | Restaurants, food delivery, beverage companies |
Type your desired 6-character header name in the Header Name field.
If your header name doesn't exactly match your registered company name, upload a supporting document proving the brand co-relation — trademark certificate, brand registration, or domain ownership proof.
Click the green "Check Availability" button. The result appears in the Availability Checked Header table on the right:
| Result | Next Step |
|---|---|
| ✅ Available — name matches company | Receive OTP, verify, submit for approval |
| ❌ Not Available | Try a different 6-character variation of your brand |
Approval Timeline
After submitting your header, SmartPing typically reviews and approves it within 24 hours. You will receive an email notification on your registered email ID once the header is approved.
Common Rejection Reasons
| Reason | Fix |
|---|---|
| Header name doesn't match company name | Upload trademark/brand/domain proof as co-relation document |
| Header already taken | Try a variation: NESRK, NSARK, NESAR etc. |
| More than 6 characters / has numbers | Use exactly 3-6 alphanumeric — no spaces |
| Generic words without brand context | Combine generic with brand: NSINFT instead of INFORM |
| Missing co-relation document | Upload GST cert, MSME cert, or trademark showing the brand name |
Need help with Header Registration?
Nesark's DLT experts handle the entire process — document verification, submission & follow-up — at no extra cost.
SMS Template Registration on SmartPing DLT — Step-by-Step Guide
Every SMS message sent in India must use a pre-approved DLT template. The template defines your message content and marks variable parts using {#var#} placeholders. Templates must be registered and approved on SmartPing before sending any SMS. If your message content is entirely fixed — with no personalised fields — you can register the template without any variables; SmartPing approves fixed-content templates just like variable templates.
What is a DLT Template?
A DLT template is your pre-approved message format. Fixed text stays as-is, and variable parts (like name, OTP, amount) are marked as {#var#}.
Step 1 — Go to Template Section
Login to smartping.live/entity/login. In the left navigation panel, click "Template". You will see your existing templates listed. Click the "New Template" button in the top right corner.
Step 2 — Fill the Template Registration Form
The Add Template / Template Registration form opens. Fill in all the required fields marked with *:
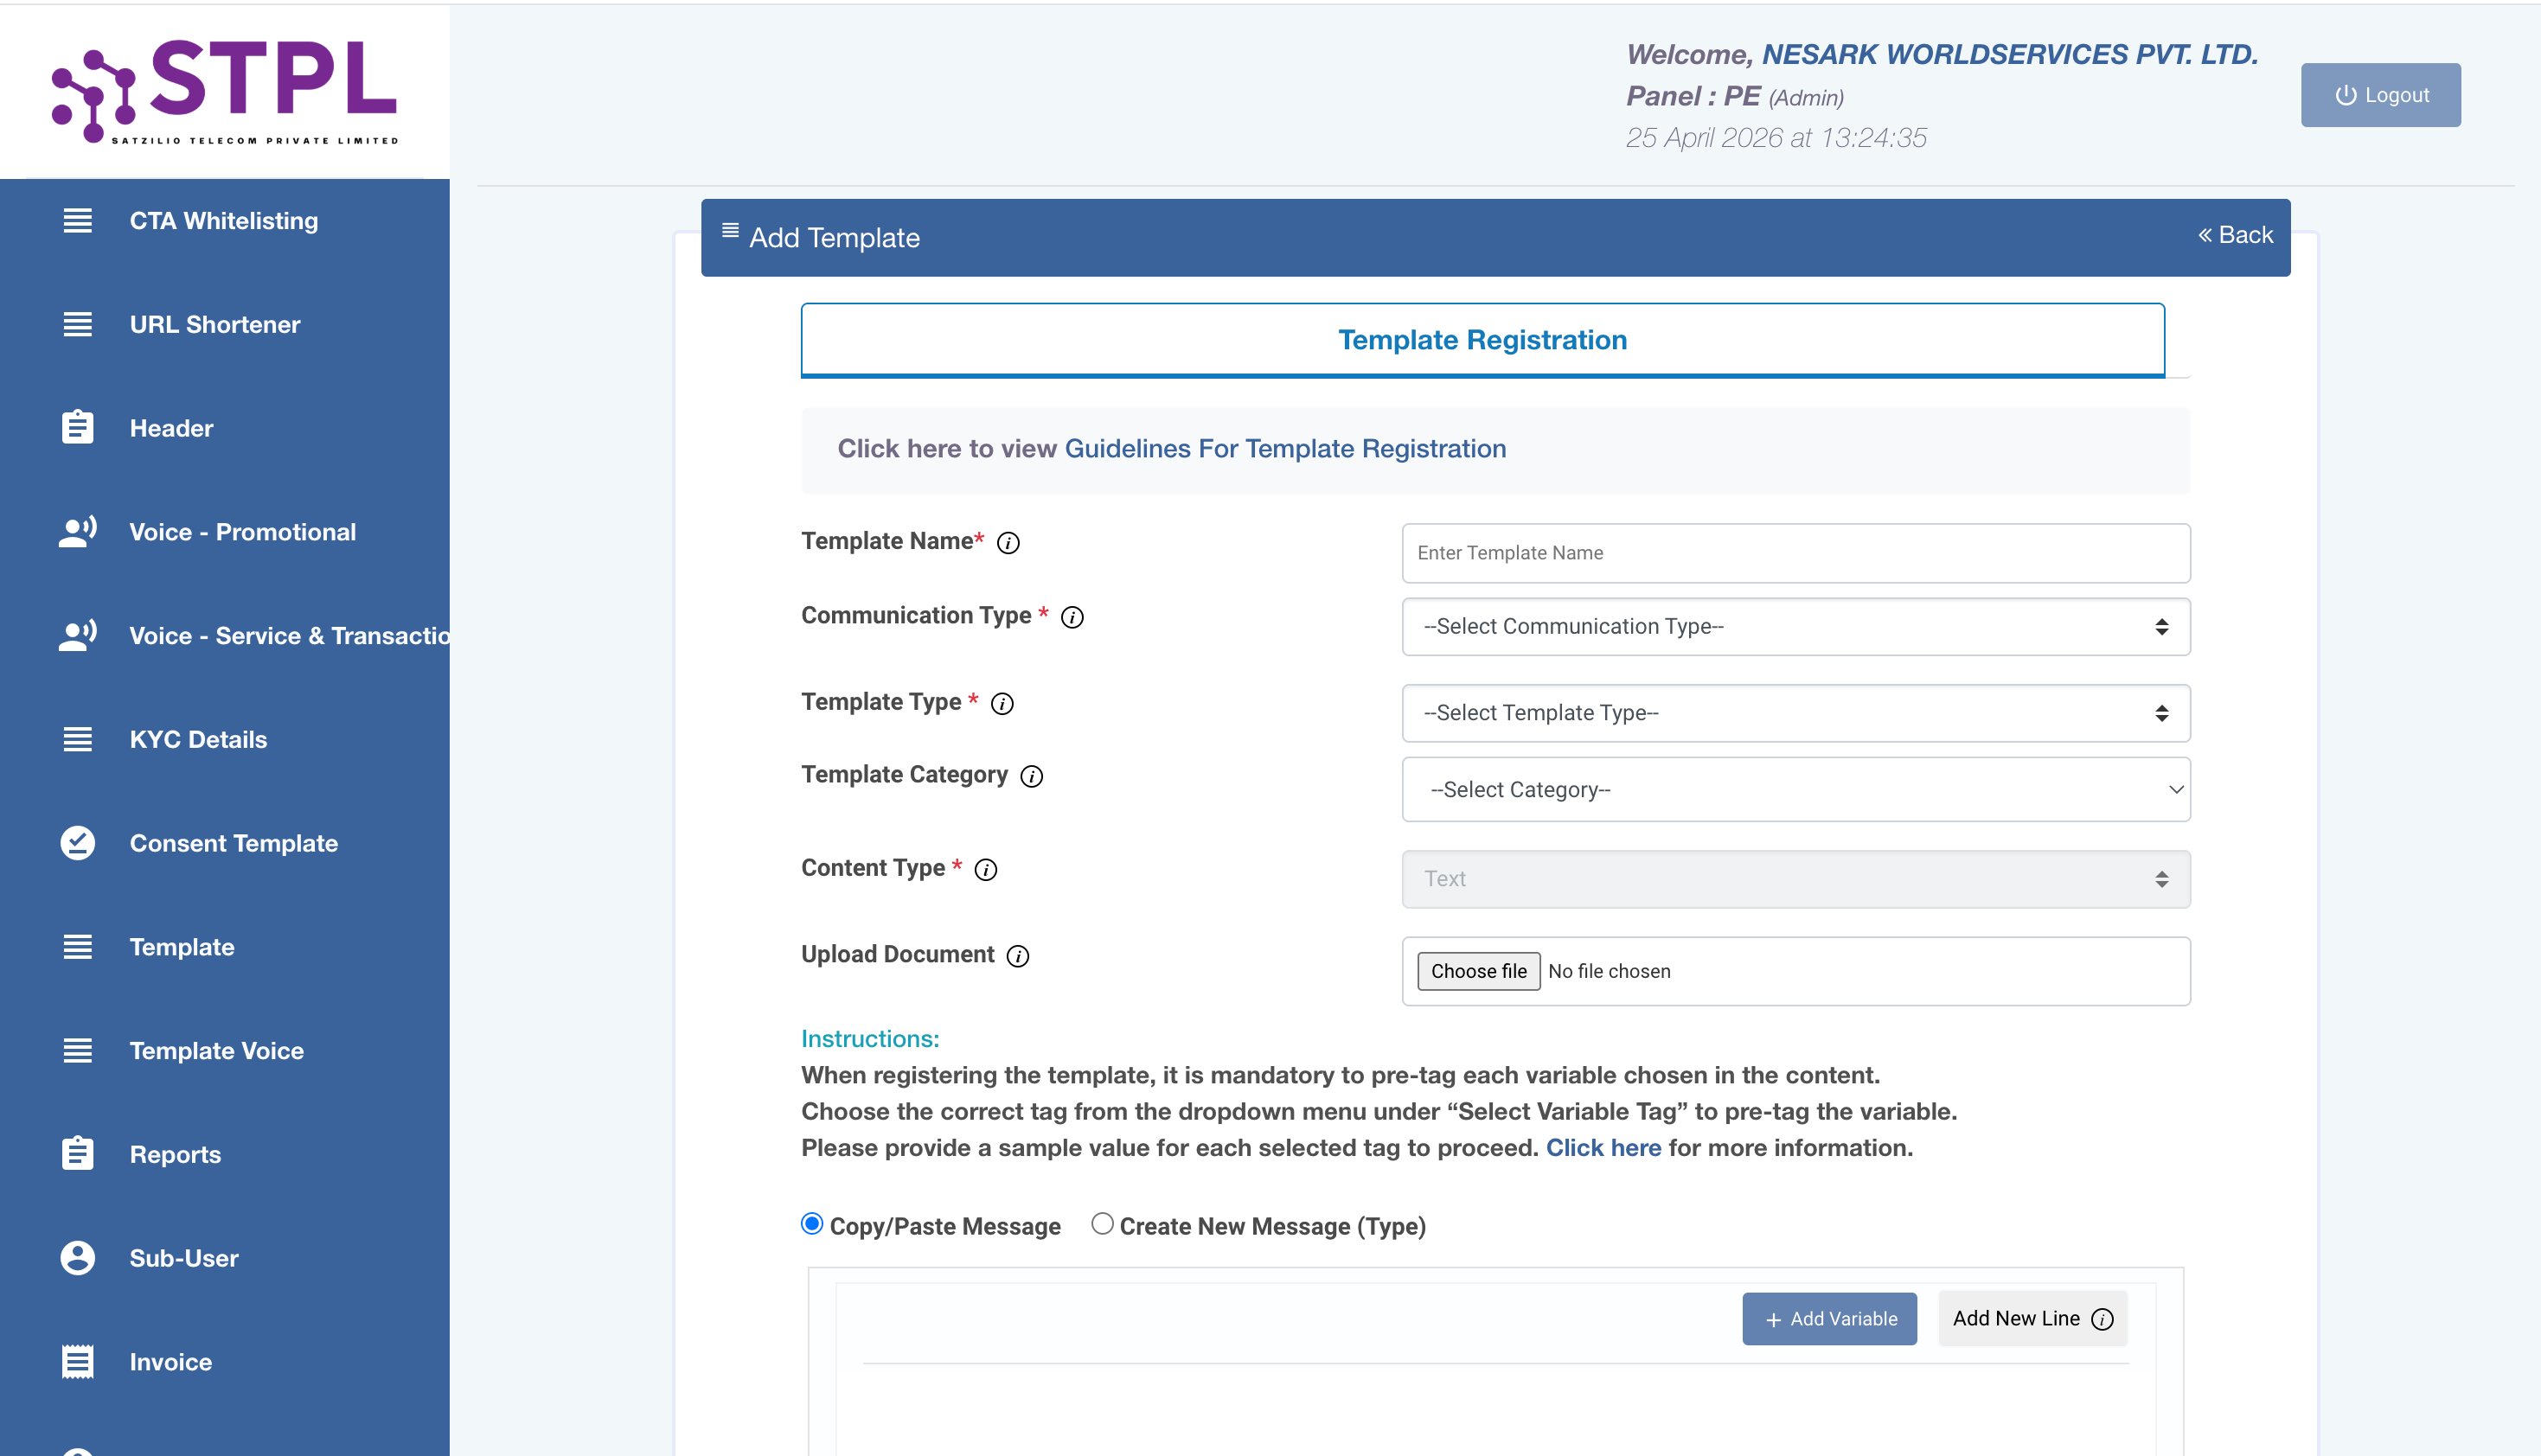
Enter a unique name for your template in the Template Name field. This is for your reference only — use a descriptive name like otp_login_v1 or order_confirmation.
The Communication Type dropdown has only one option — select SMS and proceed.
Click the Template Type dropdown and select the type that matches your message purpose. There are 4 options:

Promotional messages will now be sent using alpha headers (6-character headers) — the same format used for Service and Transactional SMS. This means a single registered header can now cover all communication types: Promotional, Service, and Transactional.
If you want to send promotional-style content using a 6-character alpha header, register your template under the Service Explicit communication type. This is now the recommended approach for alpha-header promotional messaging under the new TRAI guidelines.
| Template Type | Use For | Timing | Header Suffix |
|---|---|---|---|
| Transactional | Bank OTPs only (banks) | 24×7 | -T |
| Promotional | Marketing, offers, discounts — now via alpha header | 10AM–9PM, non-DND | -P |
| Service Explicit | Service messages where customer has opted-in | 10AM–9PM | -P |
| Service Implicit | OTPs, order alerts, notifications — most common | 24×7, all numbers | -S |
Select the Template Category that best matches your industry — same categories as Header registration (Banking, Real Estate, Education, Health, Consumer Goods, Communication/IT, Tourism, Food & Beverages).
Content Type is set to Text by default. You have two options to write your message:
| Option | How to Use |
|---|---|
| Copy/Paste Message | Paste your full message text, select words to convert to variables, click the variable button or type {#var#} manually |
| Create New Message (Type) | Type your message directly, click "+ Add Variable" to insert {#var#} at the cursor position |
✅ {#var#} placeholders are dynamic — they can be replaced with any value at the time of sending (e.g. customer name, OTP, amount, date).
❌ Fixed text cannot be modified — any word, punctuation, or space outside of {#var#} must remain exactly as approved. Even a single character change will cause a TEMPLATE_MISMATCH error and the SMS will fail to deliver.
📏 Character Limits: For English messages, 160 characters = 1 SMS. For Unicode messages (Hindi, regional languages), 70 characters = 1 SMS. Messages exceeding these limits are counted as multiple SMS and billed accordingly.
Upload a supporting document if your template content requires it (e.g. for financial or medical content). Then click Submit to send the template for approval.
After approval, you need two IDs to add your template to the Nesark panel:
1. Template ID
Go to Template menu → find your approved template in the list → click the green "Active" button on the template row. A popup will appear showing the Template Details:
| Reference Number | Internal reference (e.g. 11-WXPAMFQE4PDP) |
| Template Id | Long numeric ID — copy this (e.g. 1707175825919986883) |
| Header | The Sender ID linked to this template |
| Sample Content | Your approved template text with variables |
| Operator Status | Must show Active before you can use it |
2. PE ID (Principal Entity ID)
Your PE ID is your unique DLT entity identifier. To find it, go to Profile section in SmartPing (bottom of left navigation menu). Your PE ID will be displayed in your profile details. You will need this when setting up your Nesark account.
Step 9 — Configure Approved Header & Template in Nesark Panel
Once your template shows Approved in SmartPing, add it to your Nesark panel:
Need help creating SMS templates?
Nesark's team will write and register compliant DLT templates for your business — free of charge.
PE-TM Chain Binding on SmartPing DLT — Step-by-Step Guide
PE-TM Chain Binding links your Principal Entity (PE) to your Telemarketer (TM) — your SMS service provider like Nesark. This binding is required by TRAI so that your registered headers and templates can be used through Nesark's platform to send SMS.
What is PE-TM Chain Binding?
In TRAI's DLT framework, every SMS sent by a business must pass through an authorised Telemarketer (SMS provider). The PE-TM Chain links your registered entity to your telemarketer so that the DLT system can verify and allow your messages to go through.
Step 1 — Login to SmartPing Portal
Visit smartping.live/entity/login. Enter your Registered Email ID, Password, solve the Captcha, then click Login.
Step 2 — Go to PE-TM Chain
In the left navigation panel of your SmartPing dashboard, click "PE-TM Chain". Then click the "New Request" button to open the binding form.
Step 3 — Enter Telemarketer ID & View Details
In the Create PE-TM Chain form, enter Nesark's Telemarketer ID in the Telemarketer Id field and click "View Details" to verify.
After clicking "View Details", the portal will display the telemarketer information. Verify the details match:
| Telemarketer Name | NESARK WORLDSERVICES PRIVATE LIMITED |
| Telemarketer Id | 1602139174123904438 |
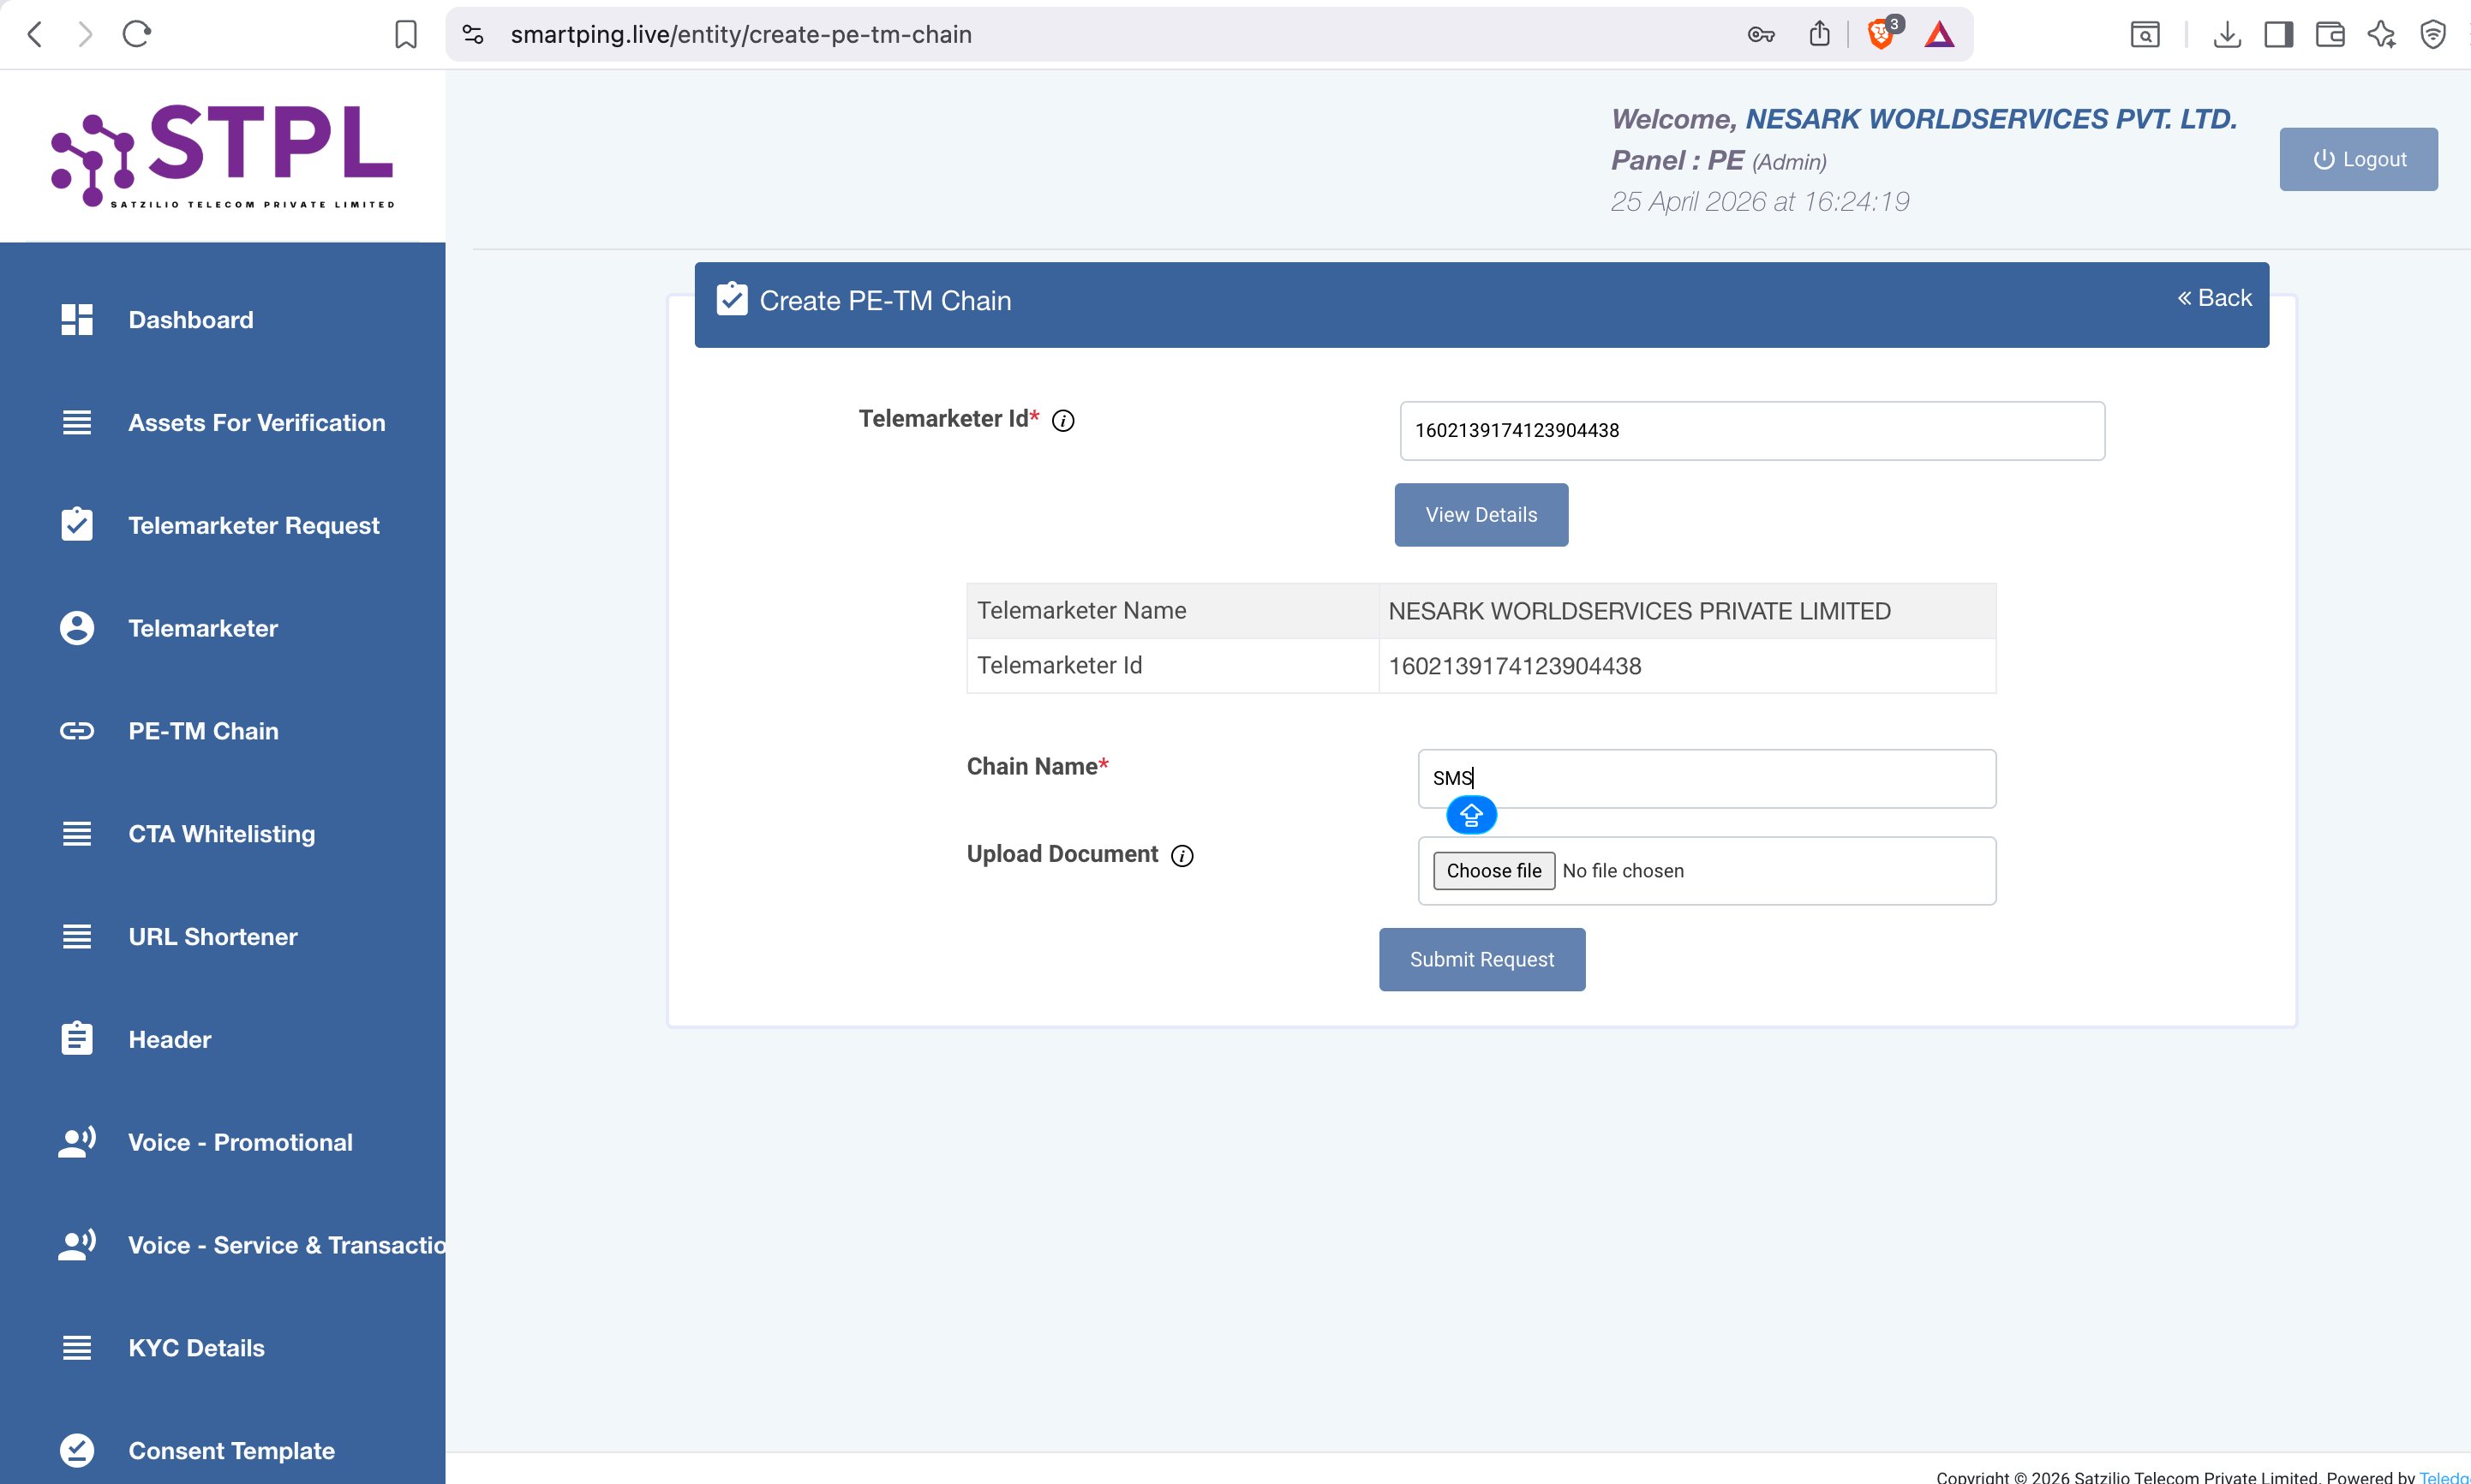
Step 4 — Fill Chain Name & Submit
Once telemarketer details are verified, fill in the remaining fields and submit:
| Field | What to Enter |
|---|---|
| Chain Name * | Type SMS — this is the standard name for an SMS telemarketer chain |
| Upload Document | Optional — upload only if specifically requested by SmartPing |
Click "Submit Request" to complete the PE-TM chain binding.
Common Questions
| Question | Answer |
|---|---|
| Do I need to bind for every header/template? | No — one PE-TM chain binding covers all your headers and templates under that entity |
| Can I bind more than one telemarketer? | Yes — you can create multiple PE-TM chains if you use more than one SMS provider |
| What if my SMS is still blocked after binding? | Check that your header and template are both in Active status on SmartPing, then contact Nesark support |
Need help with PE-TM Chain Binding?
Nesark's team will guide you through the binding process and provide the Telemarketer ID — at no extra cost.
CTA Whitelisting on SmartPing DLT — Step-by-Step Guide
CTA (Call-To-Action) Whitelisting is required when your SMS template contains a URL, app link, OTT link, Short link, or callback number. Any clickable link or action element in your SMS must be pre-approved (whitelisted) on the DLT portal before it can be used in a template.
What is CTA Whitelisting?
If your SMS contains any link (website URL, app download link, OTT link) or a callback number, TRAI requires you to whitelist that CTA on the DLT portal. Without whitelisting, SmartPing will reject the template containing that link.
Step 1 — Login to SmartPing Portal
Visit smartping.live/entity/login. Enter your Registered Email ID, Password, solve the Captcha, then click Login.
Step 2 — Go to CTA Whitelisting
In the left navigation panel, click "CTA Whitelisting". The CTA creation page opens with two tabs at the top — CTA Whitelisting and Short URL. Select the tab based on what you need to register.
Step 3 — Select CTA Type
| Tab | Use For |
|---|---|
| CTA Whitelisting | Whitelist a URL, APK/app link, OTT link, or callback number to use in SMS templates |
| Short URL | Whitelist a Short URL, trackable version of your URL for use in SMS |
Step 4a — CTA Whitelisting Form
Under the CTA Whitelisting tab, fill in the following fields:
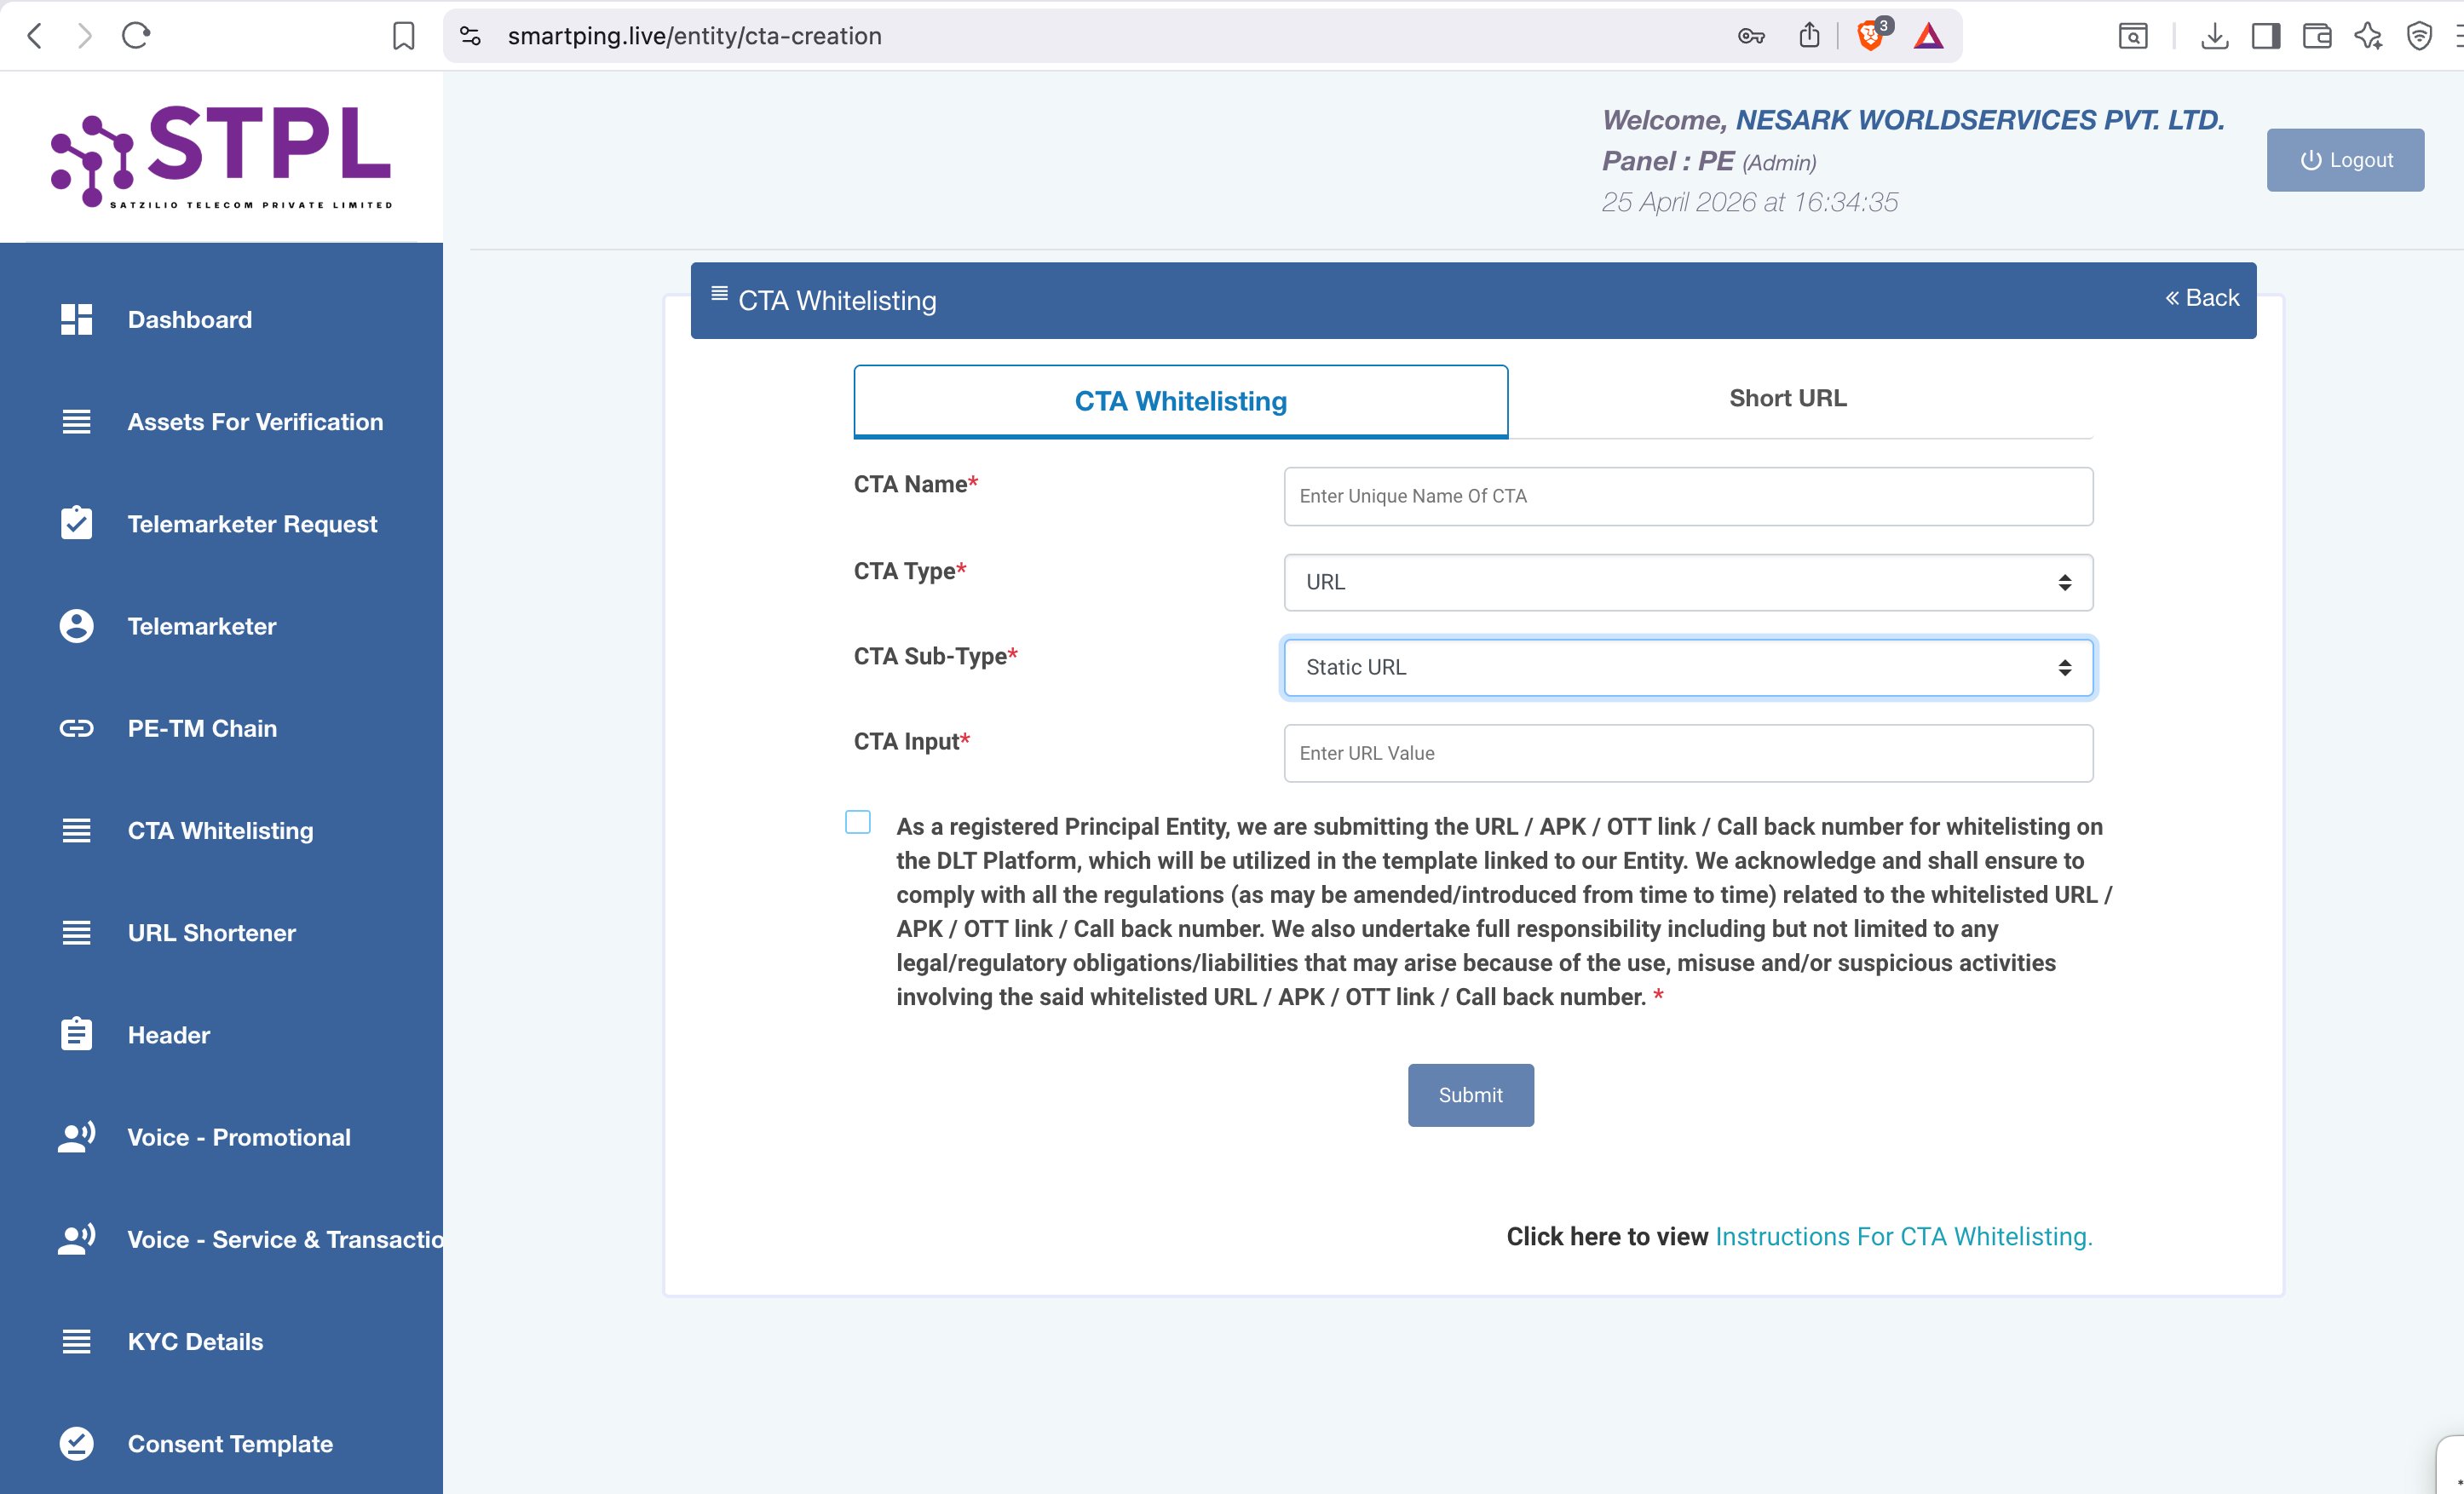
| Field | What to Enter |
|---|---|
| CTA Name * | A unique name to identify this CTA (e.g. nesark-website or order-track-url) |
| CTA Type * | Select URL for website links, APK for app download links, or OTT for OTT platform links |
| CTA Sub-Type * | Select Static URL for a fixed link, or Dynamic URL for a personalised link per recipient |
| CTA Input * | Enter the full URL or link value you want to whitelist (e.g. https://www.nesark.com) |
Step 4b — Short URL Form
If you want a shortened trackable link for your SMS, click the Short URL tab and fill in:
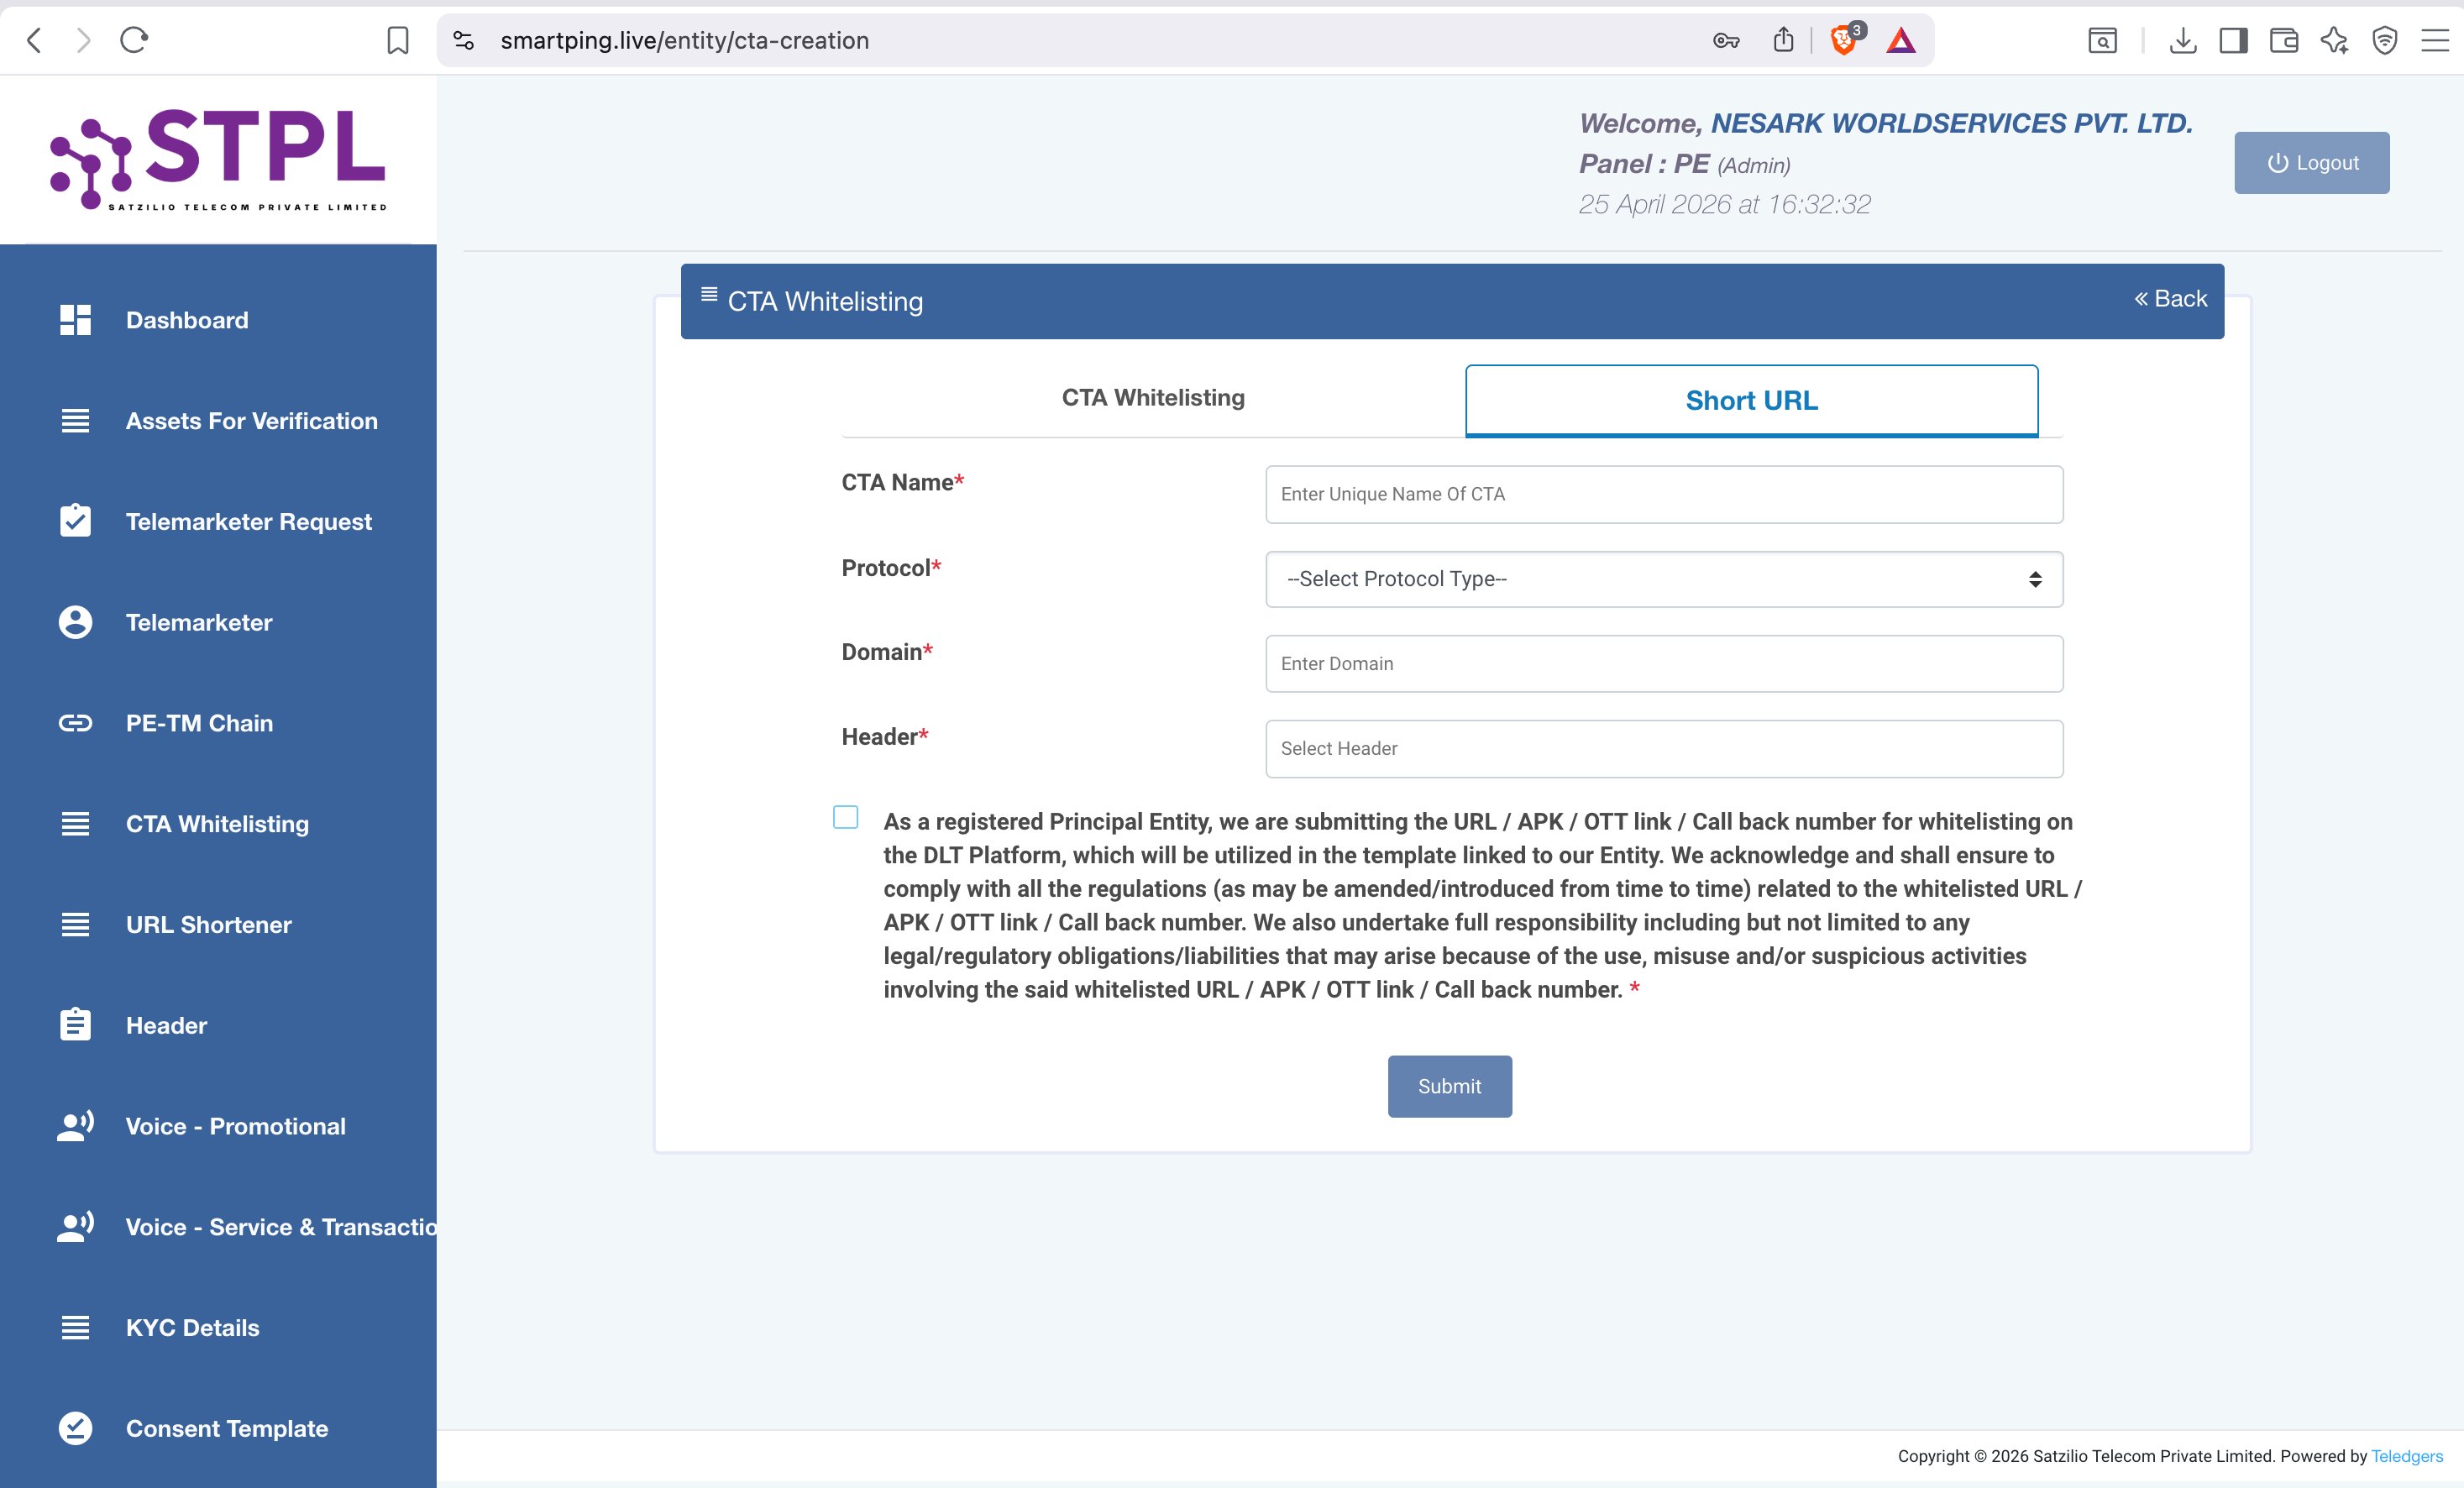
| Field | What to Enter |
|---|---|
| CTA Name * | A unique name to identify this short URL (e.g. nesark-offer-link) |
| Protocol * | Select https for secure URLs or http for non-secure |
| Domain * | Enter only the domain name — without protocol (e.g. 5az.me) |
| Header * | Select the approved Sender ID (Header) this short URL will be linked to the header gets embedded in the short URL |
Step 5 — Submit & Use in Template
Check the declaration checkbox and click Submit. Once approved, the whitelisted CTA/URL can be referenced in your SMS templates on SmartPing.
Need help with CTA Whitelisting?
Nesark's team will guide you through whitelisting your URLs and links on SmartPing DLT — at no extra cost.
Documents Required for DLT Registration
Gather these documents before starting your DLT registration to avoid delays. Ensure PAN, GST, and address proof details match exactly — mismatches are the #1 cause of DLT rejection.
For Companies / LLPs / Partnership Firms
- MSME Registration / Incorporation Certificate / GST Certificate
- Company PAN Card
- Aadhaar Card of Business Owner / Authorized Signatory
- LOA (Letter of Authorization) on company letterhead — Download LOA Format →
- Valid Email & Mobile Number
For Proprietors / Individuals
- Aadhaar Card of Owner
- Owner PAN Card
- GST Certificate (if available)
- Shop & Establishment Certificate
- Valid Email & Mobile Number
Not sure which documents you need?
Our team will send you a personalised document checklist based on your entity type.
Getting Started with Bulk SMS on Nesark
Nesark's Bulk SMS platform lets you send Transactional, Promotional, OTP and Service SMS to millions of recipients across India. This guide covers everything you need to go from signup to your first SMS campaign in minutes.
What You Need Before Starting
| DLT Registration | Entity, Header and Template must be approved on a TRAI DLT portal (SmartPing, Jio, Airtel, etc.) |
| Nesark Account | Signup at bulksms.nesark.com |
| SMS Credits | Add credits to your wallet to start sending |
| Approved Sender ID | Your 6-character DLT-registered header (e.g. NESARK) |
| Approved Templates | DLT-approved message templates with Template IDs |
Visit bulksms.nesark.com/account/register and fill in your business details — name, email, mobile number and company name. Verify your mobile via OTP to activate your account.
Go to Wallet → Add Credits. Nesark supports payment via UPI, Net Banking, credit/debit cards. Minimum recharge is ₹2000. Credits never expire.
In the Nesark Omni panel, go to Message App → Utility Manger → Manage Sender IDs → Add Sender ID. Enter your DLT-approved 6-character header exactly as it appears in SmartPing (e.g. NESARK) and click Submit.
Go to DLT Templates → Add Template. You need two things from your SmartPing portal:
| Template ID | Long numeric ID shown after template approval in SmartPing (e.g. 1707163723847123456) |
| Template Content | The exact approved message text including all {#var#} placeholders |
Go to Send SMS → Quick Send for a single SMS, or Campaigns → New Campaign for bulk sending. Select your Sender ID, choose your template, enter the recipient number and click Send.
Need help getting started?
Our team will set up your account, add your Sender ID and get your first SMS out — free onboarding support.
SMS Types: Transactional vs Promotional vs OTP
Understanding SMS route types is critical for DLT compliance. Each route has different use cases, timing rules, and DND restrictions. Sending on the wrong route will result in message failures or TRAI violations.
Route Comparison Table
| Route | Use Case | Timing | DND Numbers | Sender ID |
|---|---|---|---|---|
| 📢 Promotional | Marketing offers, discounts, campaigns | 10 AM – 9 PM only | ❌ Non-DND only | Numeric (e.g. 9XXXXXX) |
| 🔒 Transactional | Bank OTP, account alerts (banks only) | 24×7 | ✅ All numbers | 6-char (e.g. ICICIT) |
| 🔔 Service Implicit | Login OTPs, order updates, delivery alerts, service notifications | 24×7 | ✅ All numbers | 6-char (e.g. NESARK) |
Promotional SMS
Used for marketing campaigns — offers, discounts, product launches, event promotions. These SMS can only be sent to non-DND numbers between 10 AM and 9 PM. Sender ID is a numeric number assigned by the operator.
Transactional SMS
Reserved exclusively for banks sending OTP (e.g. ICICI, HDFC). Works on all numbers including DND, 24×7. Most businesses cannot use this route — they should use Service Implicit instead.
Service Implicit SMS (Most Used)
The most commonly used route for Indian businesses. Covers login OTPs, order confirmations, appointment reminders, delivery updates, account alerts, service notifications, and more. Works on all numbers 24×7.
Which Route Should I Use?
| Your SMS | Use This Route |
|---|---|
| Login OTP, signup OTP | Service Implicit |
| Order confirmation, shipping update | Service Implicit |
| Payment receipt, invoice | Service Implicit |
| Appointment reminder | Service Implicit |
| Marketing offer, sale, promotion | Promotional |
| Bank OTP (banks only) | Transactional |
Not sure which route to use?
Our team will review your use case and recommend the right SMS route for full TRAI compliance.
How to Send Bulk SMS — Complete Guide
Nesark's dashboard makes it easy to send SMS to thousands of contacts at once. You can send via Quick Send (single SMS), Campaign (bulk via contact upload), or via API. This guide covers the dashboard method.
Method 1 — Quick Send (Single SMS)
Login to bulksms.nesark.com → click Send SMS in the left menu → select Quick Send.
| Sender ID | Select your DLT-approved Header (e.g. NESARK) |
| Mobile Number | Recipient number with country code — 91XXXXXXXXXX (12 digits) |
| Template | Select from your DLT-approved templates |
| Variables | Fill in the {#var#} placeholders with actual values |
Review the final message in the preview box. Click Send SMS. You'll see a confirmation with the message ID. Check status under Reports → Delivery Reports.
Method 2 — Bulk Campaign (Upload Contacts)
Click Campaigns in the left menu → New Campaign. Give your campaign a name (e.g. "April Sale Campaign").
Upload a CSV or Excel file with mobile numbers. Format: one number per row, with country code (91XXXXXXXXXX). Maximum 1 lakh (100,000) numbers per file.
Choose your approved Sender ID and DLT Template. If your template has variables ({#var#}), map them to columns in your CSV file.
Choose Send Now for immediate delivery or Schedule to set a specific date and time. For promotional SMS, ensure your schedule falls within 10 AM – 9 PM.
Method 3 — API Integration
For developers who want to send SMS programmatically from their app or website. See our SMS API Integration guide →
Delivery Reports & Analytics — Understanding Your SMS Data
Nesark provides real-time delivery reports for every SMS you send. Understanding your delivery data helps you optimize campaigns, troubleshoot failures, and ensure maximum reach.
Accessing Delivery Reports
Login to bulksms.nesark.com → click Reports in the left menu. You will see three sections:
| Delivery Reports | Individual SMS delivery status with message-level details |
| Campaign Reports | Summary stats for bulk campaigns — total sent, delivered %, cost |
| API Reports | SMS sent via API integration with message IDs |
Understanding Delivery Status Codes
| Status | Meaning | Action |
|---|---|---|
| DELIVERED | SMS successfully delivered to recipient's phone | No action needed ✅ |
| SENT | SMS submitted to telecom operator, awaiting delivery confirmation | Wait 1–2 minutes |
| FAILED | SMS could not be delivered — invalid number, DND, or network issue | Check error code below |
| PENDING | SMS queued for delivery (usually during high volume) | Wait, delivery in progress |
| REJECTED | SMS rejected by DLT — template mismatch or header issue | Check DLT template mapping |
| NDNC / DND | Number is on the Do Not Disturb registry | Remove from promotional list |
Common Failure Reasons & Fixes
| Error | Cause | Fix |
|---|---|---|
| TEMPLATE_MISMATCH | Message content doesn't match DLT template | Ensure your message exactly matches the approved template including {#var#} positions |
| INVALID_HEADER | Sender ID not approved or incorrectly mapped | Check Sender ID is DLT approved and added to Nesark dashboard |
| INSUFFICIENT_CREDITS | Wallet balance is zero or too low | Add credits under Wallet → Add Credits |
| INVALID_MOBILE | Number format is wrong or number doesn't exist | Ensure numbers are 10 digits (or 12 with 91 prefix) |
| DND / NDNC | Number registered on DND list | Normal for promotional SMS — remove from list or switch to Service route |
Downloading Reports
Use the date range picker and status filter to narrow down your report. You can filter by: All, Delivered, Failed, Pending, Rejected.
Click Download Report → choose Excel (.xlsx) or CSV format. The export includes: Mobile Number, Message, Sender ID, Status, Delivery Time, Operator, and Error Code.
High failure rate on your campaign?
Share your delivery report with our team and we'll diagnose the issue for you — free technical support.
OTP API Guide — Send OTP for Verification via Nesark
Nesark's OTP API lets you generate and deliver one-time passwords to any Indian mobile number via SMS. Use it for login verification, signup confirmation, account changes, and any action that requires mobile number ownership proof. Free API access is available for all Nesark accounts.
How OTP Verification Works
The OTP flow has 3 steps:
| Step | Action | Who Does It |
|---|---|---|
| 1. Generate | Your server creates a random 4–6 digit OTP and stores it temporarily | Your backend |
| 2. Deliver | Your server calls Nesark's SMS API to send the OTP to the user's mobile | Nesark API |
| 3. Verify | User enters the OTP on your app/website; your server validates it | Your backend |
Step 1 — Get Your API Key
Login to bulksms.nesark.com → go to Developer → API Key → Add API Key. Copy your API key — you'll need it for every API call. Keep it secret and never expose it in frontend code.
Step 2 — Set Up DLT Header & OTP Template
OTP SMS requires a DLT-approved template on the Service Implicit route. Your template must look like this:
Dear {#var#}, your OTP for verification is {#var#}. Valid for 10 minutes. Do not share with anyone. — NESARK The {#var#} placeholders are replaced with actual values (name, OTP code) when you call the API.Add your approved DLT Header and Template to Nesark panel — see the Getting Started guide →
Need help integrating OTP API?
Our developer support team can help you integrate Nesark OTP API into your website or app — free technical assistance.
WhatsApp Business API Setup Guide
Nesark's WhatsApp Business API lets you send verified, two-way messages to customers on the world's most popular messaging platform — with zero setup fee. From promotional broadcasts to OTPs, customer support to chatbots, everything is possible through one API.
What You Get with Nesark WhatsApp API
| Broadcast Messages | Send promotional offers, discounts, and announcements to unlimited customers officially |
| Utility Notifications | OTPs, order confirmations, delivery updates, payment alerts — 24×7 |
| Two-way Chat | Customers can reply — handle support, sales, and queries in real time |
| Chatbot Automation | No-code chatbots for FAQs, lead capture, and customer journeys |
| Rich Media | Images, PDFs, videos, buttons, carousels — far beyond plain text SMS |
| Green Tick Verified | Official verified business badge builds trust with customers |
Documents Required
| 1 | Business Logo (high quality PNG/JPG) |
| 2 | Business Website with SSL — must show legal name, address, privacy policy, terms & conditions |
| 3 | Business Email address |
| 4 | Incorporation Certificate / MSME Registration / GST Registration |
| 5 | PAN Card (Personal or Business) |
| 6 | Aadhaar Card of Business Owner |
| 7 | New/Fresh Facebook (Meta) Business Account |
| 8 | Fresh Mobile Number (not linked to any WhatsApp account) |
Setup Process — Step by Step
Reach out to Nesark via nesark.com/contact or book a free demo. Our team will guide you through the entire setup at zero setup cost.
Create a new Facebook/Meta Business Manager account at business.facebook.com. Add your business details, verify your email, and set up two-factor authentication.
Upload your business documents (incorporation certificate, PAN, website) to Meta Business Manager. Meta will review and verify your business — this typically takes 24–48 hours but can take up to a few days.
Nesark's team registers your fresh mobile number as a WhatsApp Business Account (WABA). The number will receive a verification OTP. Once verified, your WABA is live and connected to the Nesark platform.
Create your message templates in the Nesark dashboard. Templates are reviewed by Meta — approval typically takes a few minutes to 24 hours. Once approved, you're ready to send.
Get WhatsApp Business API — Zero Setup Fee
Nesark sets up your entire WhatsApp API for free. Book a demo and go live in 24–48 hours.
Creating WhatsApp Message Templates
WhatsApp requires all business-initiated messages to use pre-approved templates. These templates are reviewed by Meta before use. Once approved, you can send them to any number at any time — perfect for broadcasts, OTPs, order updates, and notifications.
Template Categories
| Category | Use Case | Examples |
|---|---|---|
| Marketing | Promotional messages, offers, campaigns | Sale announcements, product launches, discount codes |
| Utility | Transactional/service notifications | Order confirmation, OTP, payment receipt, delivery update |
| Authentication | One-time passwords only | Login OTP, verification code, 2FA |
Creating a Template — Step by Step
Login to bulksms.nesark.com → go to WhatsApp → Templates → Create Template.
Enter a unique template name (lowercase, underscores only — e.g. order_confirmation_v1). Select the appropriate category: Marketing, Utility, or Authentication.
A template has up to 4 sections:
| Header | Optional — text, image, video, or document (shown at top) |
| Body | Required — main message text with optional variables like {{1}}, {{2}} |
| Footer | Optional — small text at bottom (e.g. "Reply STOP to unsubscribe") |
| Buttons | Optional — Quick Reply, Call to Action (URL or phone call) |
Click Submit for Review. Meta reviews templates automatically — most are approved within a few minutes to a few hours. You'll get notified once approved.
Common Template Rejection Reasons
| Rejection Reason | Fix |
|---|---|
| Content violates WhatsApp policy | Remove promotional language from Utility templates; use Marketing category instead |
| Too many variables | Reduce variable count — each variable must have clear, predictable content |
| Misleading content | Template must clearly identify your business and purpose |
| Category mismatch | Promotional content must be in Marketing, not Utility category |
Need help creating compliant templates?
Our team reviews your template content and ensures first-attempt approval from Meta.
WABA Approval & Business Verification
A WhatsApp Business Account (WABA) is your verified business identity on WhatsApp. Getting your WABA approved by Meta unlocks higher messaging limits, the green tick badge, and access to all API features. This guide explains the verification process.
WABA Approval Levels
| Level | Status | Daily Limit | Requirement |
|---|---|---|---|
| Level 1 | Unverified | 250 conversations/day | Phone number registered |
| Level 2 | Business Verified | 1,000 conversations/day | Meta Business Verification |
| Level 3 | High Volume | 10,000 conversations/day | Consistent usage + compliance |
| Level 4 | Unlimited | Unlimited | Meta approval for scale |
Business Verification Process
Visit business.facebook.com → Settings → Security Centre. Click "Start Verification" under Business Verification.
Enter your legal business name and registered address exactly as they appear on your documents. Select your country (India) and business type.
Upload any one of: GST Certificate, MSME Registration, or Incorporation Certificate. The document must clearly show your business name and official address. Images must be clear, in colour, and unedited.
Meta sends a verification code to your business email or phone. Enter the code to complete verification. Review typically takes 24–48 hours.
Getting the Green Tick (OBA)
The green tick (Official Business Account) shows a verified badge next to your business name in WhatsApp. Requirements:
| Business Verification | Must be completed on Meta Business Manager |
| Brand Presence | Active website, social media, news coverage or brand recognition |
| Policy Compliance | No policy violations on your WABA account |
| Application | Submit via Nesark — our team applies on your behalf |
Need help with WABA verification or Green Tick?
Nesark's team handles Meta verification, escalation, and green tick applications for you.
What is RCS Messaging & How it Works
RCS (Rich Communication Services) is the next evolution of SMS — delivering interactive, media-rich messages directly in the native Android Messages app, with no extra app download required. Think of it as WhatsApp-like features built into the default SMS app.
RCS vs SMS vs WhatsApp
| Feature | SMS | RCS | |
|---|---|---|---|
| Images / Videos | ❌ | ✅ | ✅ |
| Action Buttons (CTAs) | ❌ | ✅ | ✅ |
| Carousels | ❌ | ✅ | ✅ |
| Verified Sender Branding | ✅ | ✅ | ✅ |
| Read Receipts | ❌ | ✅ | ✅ |
| App Download Required | ❌ | ❌ | ❌ |
| DLT Registration | ✅ Required | ❌ Not Required | ❌ Not Required |
| Works Without Internet | ✅ | ❌ | ❌ |
Types of RCS Messages
| Type | Use Case |
|---|---|
| 📢 Promotional RCS | Offers, discounts, festive campaigns, product launches with images and CTA buttons |
| 🔔 Transactional RCS | Order confirmations, delivery updates, account alerts, service notifications |
| 🔒 OTP Verification | Secure one-time passwords with branded sender identity |
Key RCS Features
| Branded Messages | Your business name, logo, and verified checkmark appear on every message |
| Rich Media | High-res images, videos, GIFs, audio files, and location sharing |
| Quick Reply Buttons | Customers tap to respond — no typing needed |
| CTA Buttons | Call Now, Visit Website, Open App — directly from the message |
| Carousels | Swipeable product/service cards with images and buttons |
| Read Receipts | Know exactly when your message was delivered and read |
Ready to upgrade to RCS?
Nesark offers RCS Business Messaging with zero setup fee. Book a free demo today.
RCS Onboarding Process
Getting started with RCS Business Messaging on Nesark is straightforward — no DLT registration needed. The process involves registering your RCS Agent (your brand identity on RCS), getting Google approval, and launching your first campaign.
Documents Required for RCS Onboarding
| 1 | Business name and logo (high quality, square format preferred) |
| 2 | Business website URL with SSL certificate |
| 3 | Business email address |
| 4 | Sample message templates you plan to send |
| 5 | GST / Incorporation Certificate / MSME Registration |
Onboarding Steps
Complete the official RCS onboarding form: forms.gle/MwWyzAk2mpW8jDGV9. Fill in your business details, brand information, and use case description.
Nesark creates your RCS Agent — your verified brand identity that appears on every RCS message. This includes your logo, business name, description, website, and contact details.
Your RCS Agent is submitted to Google and Indian telecom operators (Jio, Airtel, Vi) for review. Approval typically takes 5–10 business days.
Once approved, Nesark connects your RCS Agent to the dashboard. Test your messages on your own Android device first, then launch your first campaign.
Start RCS Onboarding with Nesark
Zero setup fee. Our team manages the entire RCS agent creation and approval process for you.
Voice OBD / IVR Basics — Automated Voice Calls
Nesark's Voice Broadcasting (OBD — Outbound Dialing) service lets you send pre-recorded voice messages to thousands of phone numbers simultaneously — fully automated, no manual calling required. Perfect for announcements, reminders, promotions, and alerts.
Voice Solutions Available on Nesark
| Solution | Description | Best For |
|---|---|---|
| Simple IVR | Plays pre-recorded voice message — no input collected | Bulk announcements, promotions, alerts |
| DTMF Input | Customers press keypad options (Press 1 / Press 2) | Surveys, confirmations, lead qualification |
| Call Patch | Transfers call to live agent after IVR | Sales calls, support escalation |
| TTS (Text-to-Speech) | Converts typed text to natural voice automatically | Personalized messages with name/amount/date |
| Custom IVR | Multi-level menus, complex routing | Banks, enterprises, large organizations |
How to Send a Voice Campaign
Login to voice.nesark.com with your Nesark credentials. This is a separate panel from the SMS dashboard.
Go to Audio → Upload Audio. Supported formats: .mp3 and .wav. Keep the message under 30 seconds for best pickup rates. Record clearly in a quiet environment.
Upload a CSV/Excel file with phone numbers (10-digit Indian mobile numbers). Remove duplicates and invalid numbers. Maximum 1 lakh numbers per campaign file.
Go to Campaigns → New Campaign. Select your audio file and contact list. Choose Send Now or use Smart Scheduling to pick a future date and time for better pickup rates.
Track your campaign in Reports → Call Reports. View: Total Dialled, Answered, Unanswered, Call Duration, Busy/No Answer, and DTMF responses (if applicable).
Industries & Use Cases
| Industry | Use Case |
|---|---|
| E-Commerce | Order confirmations, delivery updates, feedback requests |
| Healthcare | Appointment reminders, prescription alerts, health tips |
| Education | Exam schedules, fee reminders, event notifications |
| Financial Services | Payment due reminders, EMI alerts, account updates |
| Travel | Booking confirmations, check-in reminders, flight updates |
| Political/Elections | Mass awareness campaigns, voter outreach |
Ready to launch your Voice campaign?
Book a free demo and our team will set up your first campaign — end to end.
Signup & Account Setup
Creating a Nesark account takes less than 2 minutes. Sign up, verify your mobile, and get ₹10 free credits instantly to test the platform before paying anything.
Visit bulksms.nesark.com/account/register. Enter your name, business email, mobile number, and company name. Click Register.
Enter the OTP sent to your mobile number to activate your account. Your account is now live and ready to use.
To activate your Nesark account, you need to submit the following verification documents to the Nesark team. Email all documents to info@nesark.com along with your registered username. The Nesark team will verify and activate your account.
Documents Required:
| Document | Details |
|---|---|
| MSME / Incorporation / GST Certificate | Any one valid business registration document |
| PAN Card | Business or owner — clear legible copy, all 4 corners visible |
| Aadhaar Card | Business owner — front & back copy, both sides clearly visible |
After activation, go to Message App → Utility Manger → Manage Sender IDs → Add Sender ID. Enter your DLT approved 6-character header. See the Getting Started with SMS guide → for full setup.
Nesark Products Overview
| Product | Panel URL | Use For |
|---|---|---|
| Omni Panel (SMS/RCS/WA) | bulksms.nesark.com | SMS, RCS, WhatsApp, API |
| Voice Panel (OBD) | voice.nesark.com | Voice calls, IVR campaigns |
| API Documentation | developers.aoc-portal.com | SMS, OTP, RCS, WhatsApp API |
Need help setting up your account?
Our onboarding team will set up your account, Sender ID, and first campaign — free of charge.
How to Add Credits / Recharge Your Wallet
Nesark uses a prepaid credit wallet system. Add credits anytime via UPI, Net Banking, or card. Credits never expire and are shared across SMS, RCS and WhatsApp services from a single wallet.
Login to bulksms.nesark.com → click Wallet in the left menu. The Wallet section shows your current balance and transaction history only. To add credits, you need to visit the Nesark Payment Page.
Go to nesark.com/payment to recharge your account. Choose your recharge amount and complete the payment using any of the following methods:
| 🏦 Bank Transfer | NEFT / RTGS |
| ⚡ Instant Transfer | UPI / IMPS |
| 📱 Scan QR | PhonePe / GPay / Paytm |
| 🏢 Branch / Cash | Cash Deposit |
After completing the payment, take a screenshot of the payment confirmation and share it with the Nesark team via WhatsApp or email. Include your registered username and transaction amount.
Billing & Invoices
After every recharge, a GST invoice is sent to your registered email by the Nesark billing team.
| View Transactions | Wallet → Transaction History (balance & past credits visible) |
| GST Invoice | Sent by the Nesark billing team to your registered email after wallet is credited |
| Refund Policy | Unused credits are not refundable — see Refund Policy → |
Payment issue or credits not received?
Contact our billing support with your transaction ID — we resolve payment issues within 2 hours.
Article Title
This article is coming soon. Please contact our support team for immediate assistance.
Can't find what you're looking for?
Our support team is available Mon–Fri, 10AM to 7PM.